> ## Documentation Index
> Fetch the complete documentation index at: https://docs.fieldiu.com/llms.txt
> Use this file to discover all available pages before exploring further.
# Advanced wizard
> ### 💡 What is "Advanced Wizard"
>
> You can use the advanced wizard to add items in bulk, edit, and control everything, in **service lines** including the smallest details. For more information
### 1. Advanced Wizard
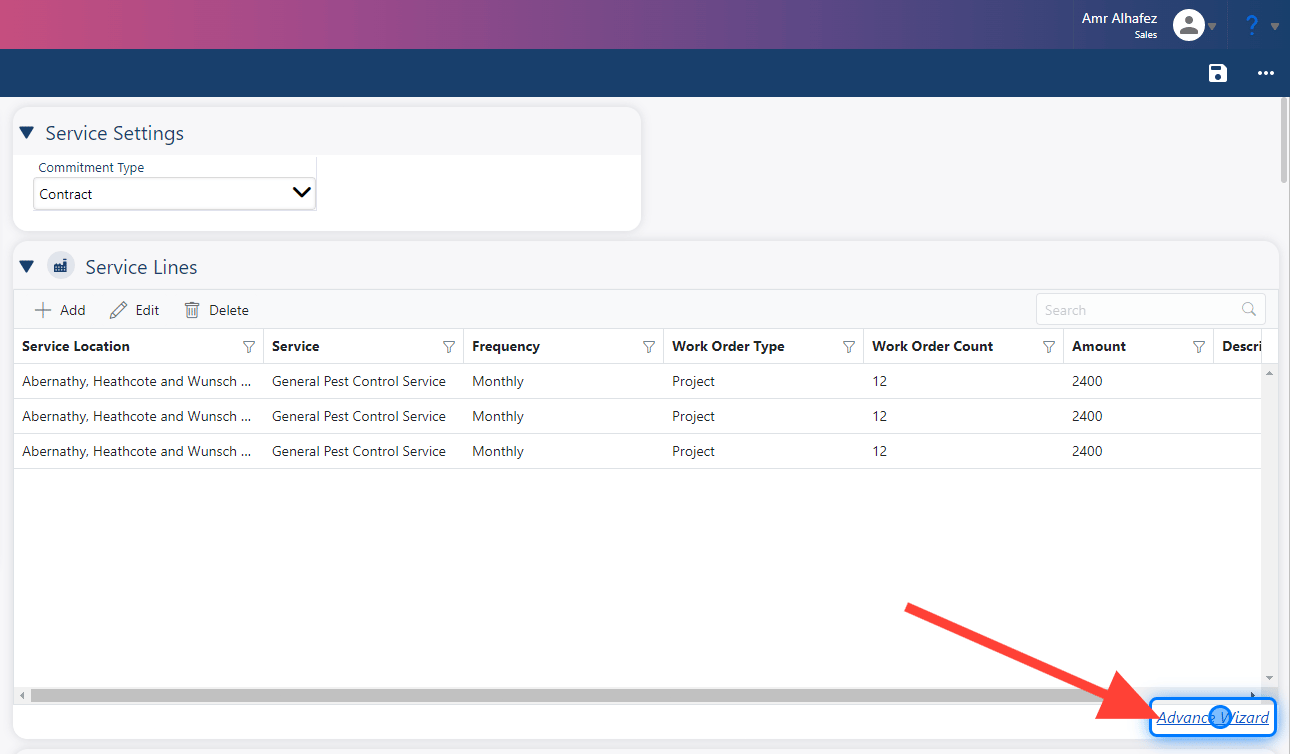
You can access the Advanced Wizard by clicking the "Advanced Wizard" button in the Service Lines section.
 > ### 💡 Sections
>
> Once you click the button, a new window will appear with two main sections:
>
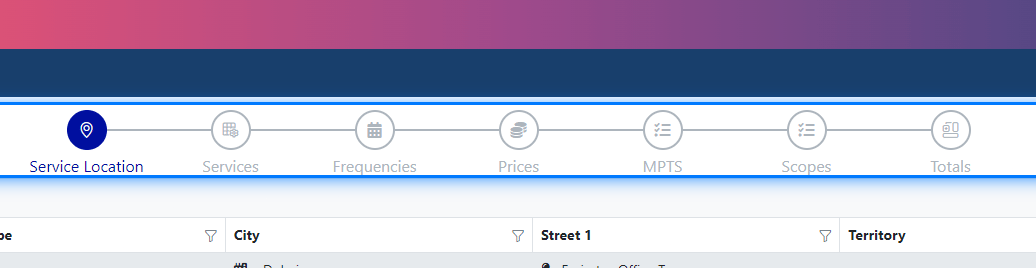
> **Process Bar** : Here, you can see the steps you've completed and easily navigate between them by clicking on the step icons.
>
> **Details Section** : This is where you can enter or add details for the service lines.
### 2. Process Bar
> ### 💡 Sections
>
> Once you click the button, a new window will appear with two main sections:
>
> **Process Bar** : Here, you can see the steps you've completed and easily navigate between them by clicking on the step icons.
>
> **Details Section** : This is where you can enter or add details for the service lines.
### 2. Process Bar
 ### 3. Adding Service Lines
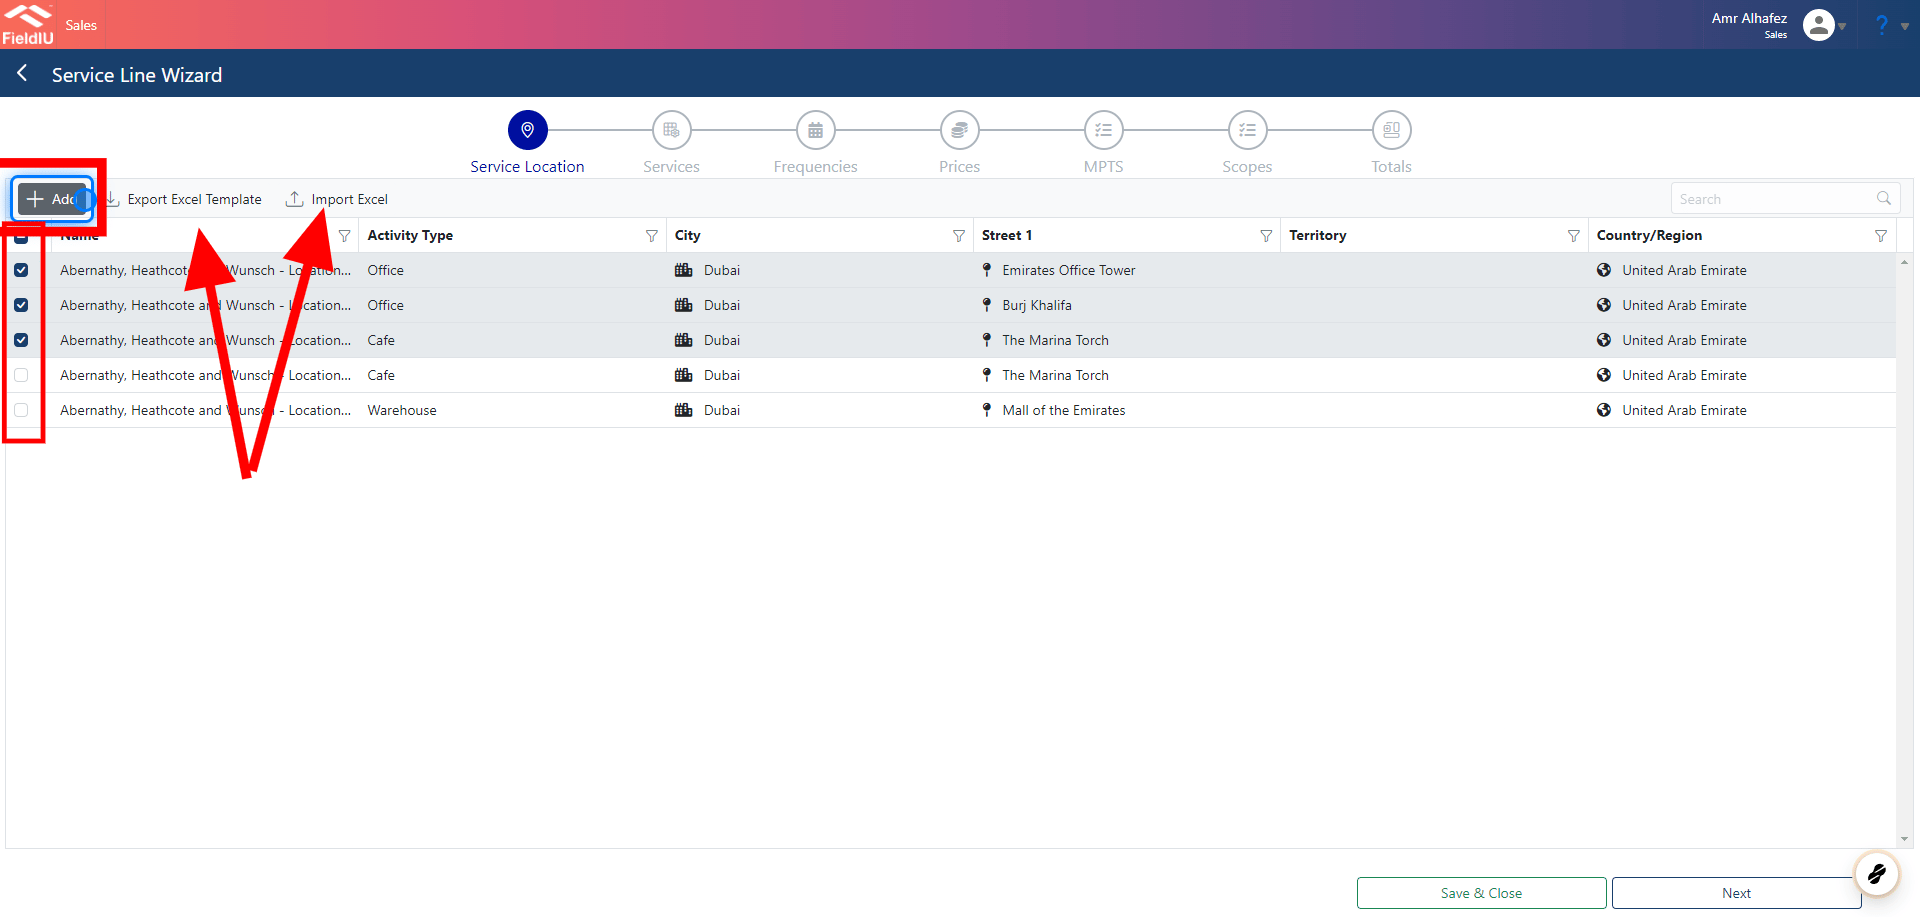
When using the Advanced Wizard, you can take advantage of bulk editing and bulk adding. You can download the Service Lines Excel template and import it using the "Import" button on the toolbar. Additionally, you can add entries one by one using the "Add" button.
### 3. Adding Service Lines
When using the Advanced Wizard, you can take advantage of bulk editing and bulk adding. You can download the Service Lines Excel template and import it using the "Import" button on the toolbar. Additionally, you can add entries one by one using the "Add" button.
 ### 4. Selecting Service Line
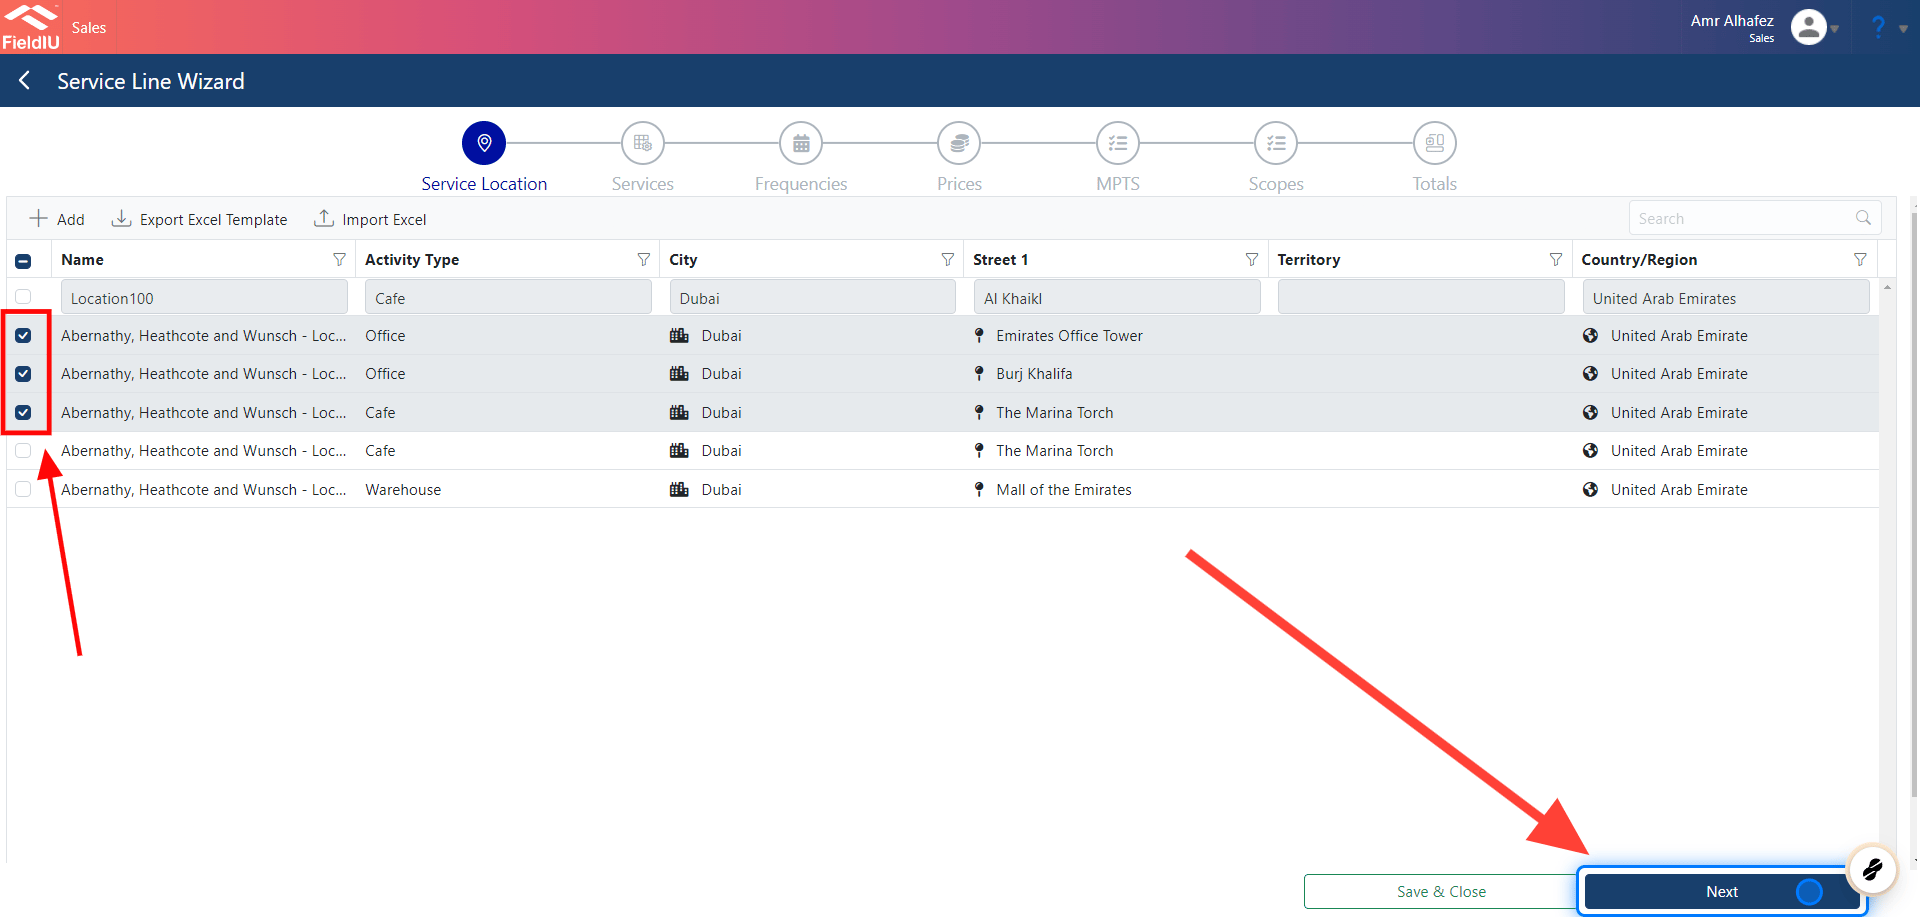
You can also add lines without including them in the current opportunity, which allows you to save them for future use or for another offer or opportunity.
Click "Next" to proceed to the next step, or select "Save & Close" to edit later
### 4. Selecting Service Line
You can also add lines without including them in the current opportunity, which allows you to save them for future use or for another offer or opportunity.
Click "Next" to proceed to the next step, or select "Save & Close" to edit later
 ### 5. Selecting Services
By clicking duple click on the service you can edit the services that you want for this location
### 5. Selecting Services
By clicking duple click on the service you can edit the services that you want for this location
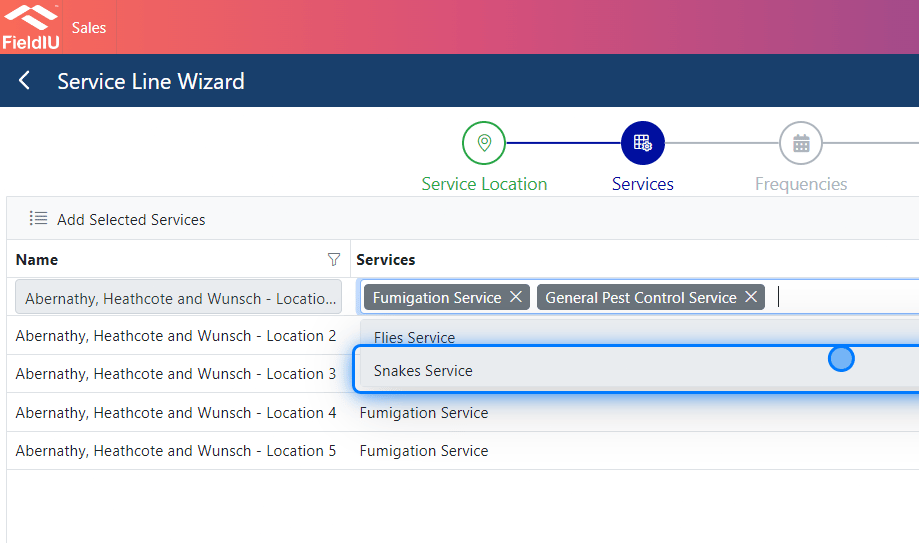 ### 6. Multi Deferent Services
As you can see, we can assign different services to each location
### 6. Multi Deferent Services
As you can see, we can assign different services to each location
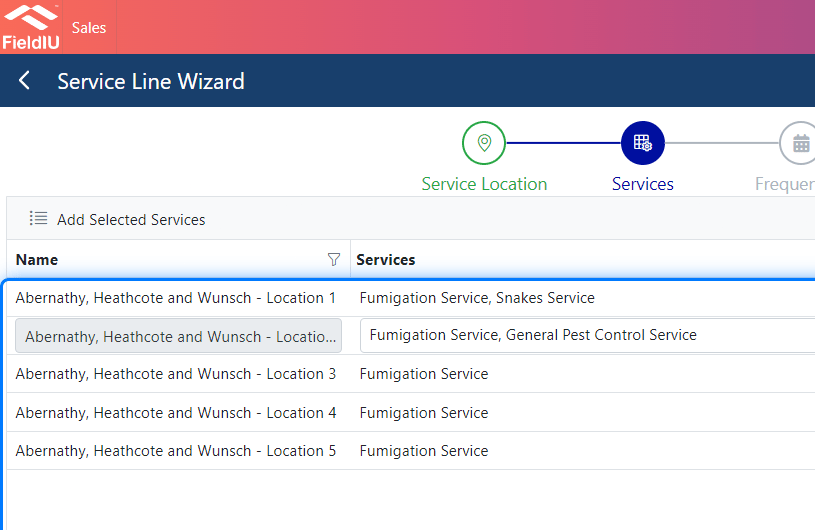 ### 7. Frequencies
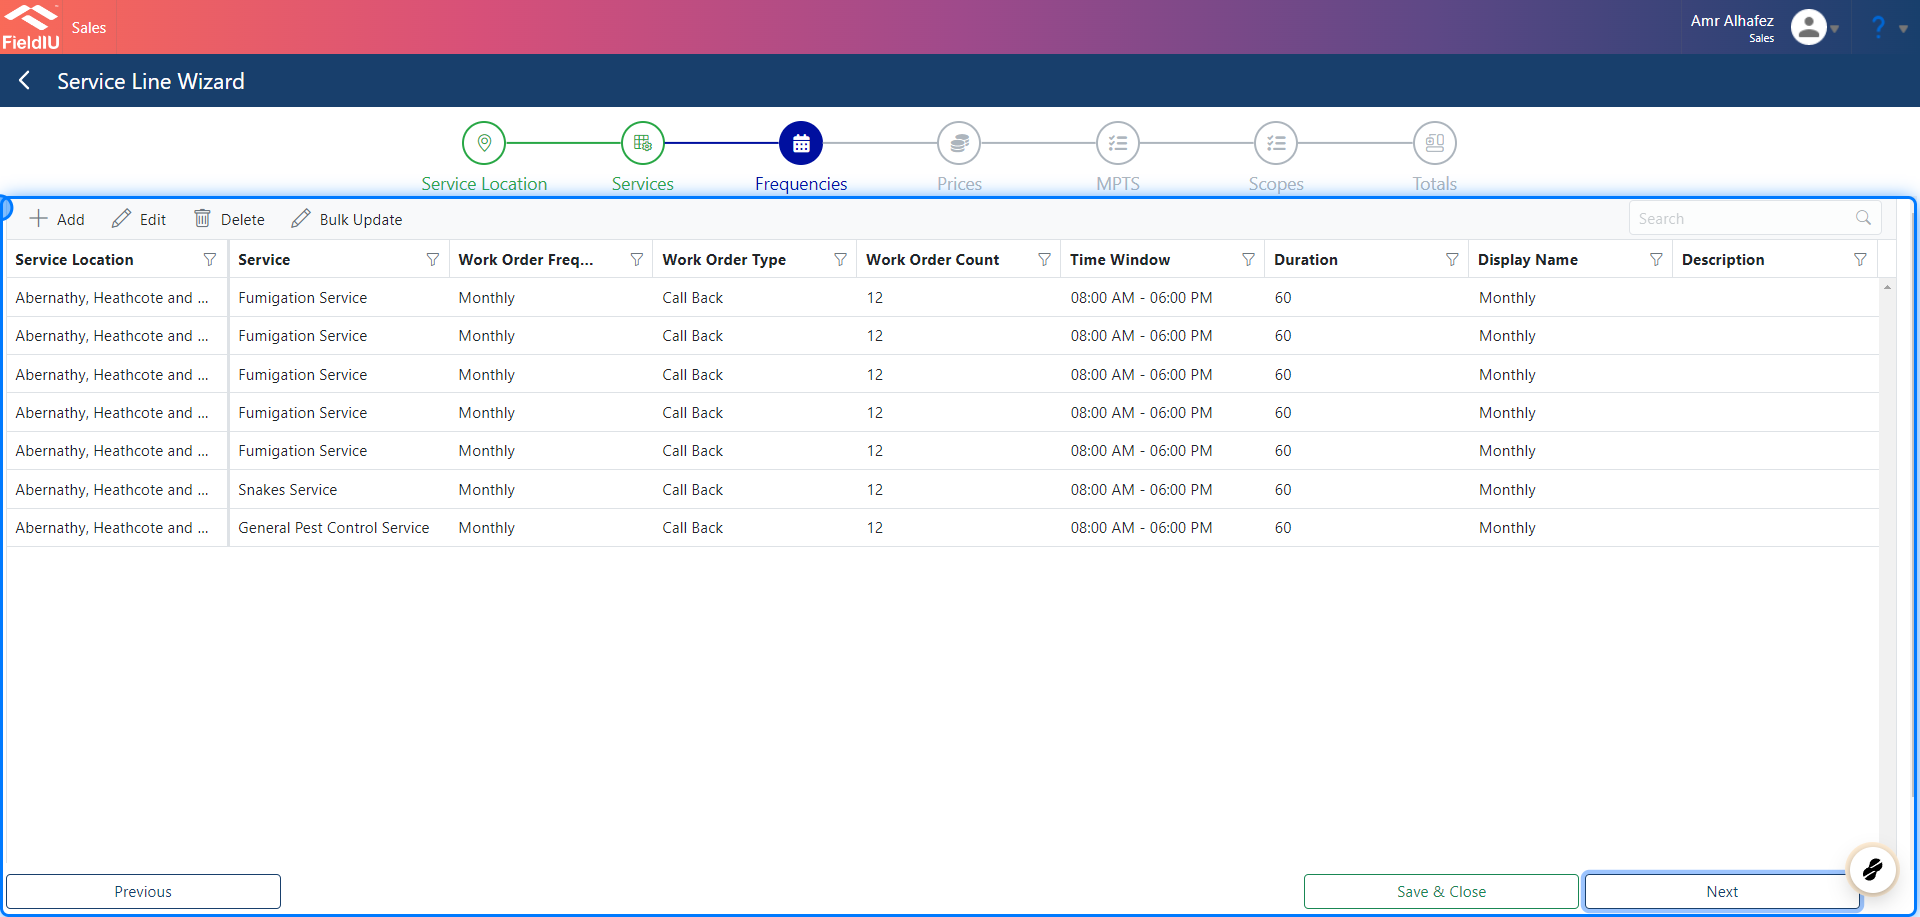
Define how often services should occur for each location.
For each location, you can assign a frequency to each service and provide all the relevant details, such as:
* Work Order Count
* Work Order Type
* Frequency
* Time Window
* Duration
* Display Name
* Description
### 7. Frequencies
Define how often services should occur for each location.
For each location, you can assign a frequency to each service and provide all the relevant details, such as:
* Work Order Count
* Work Order Type
* Frequency
* Time Window
* Duration
* Display Name
* Description
 ### 8. Edit
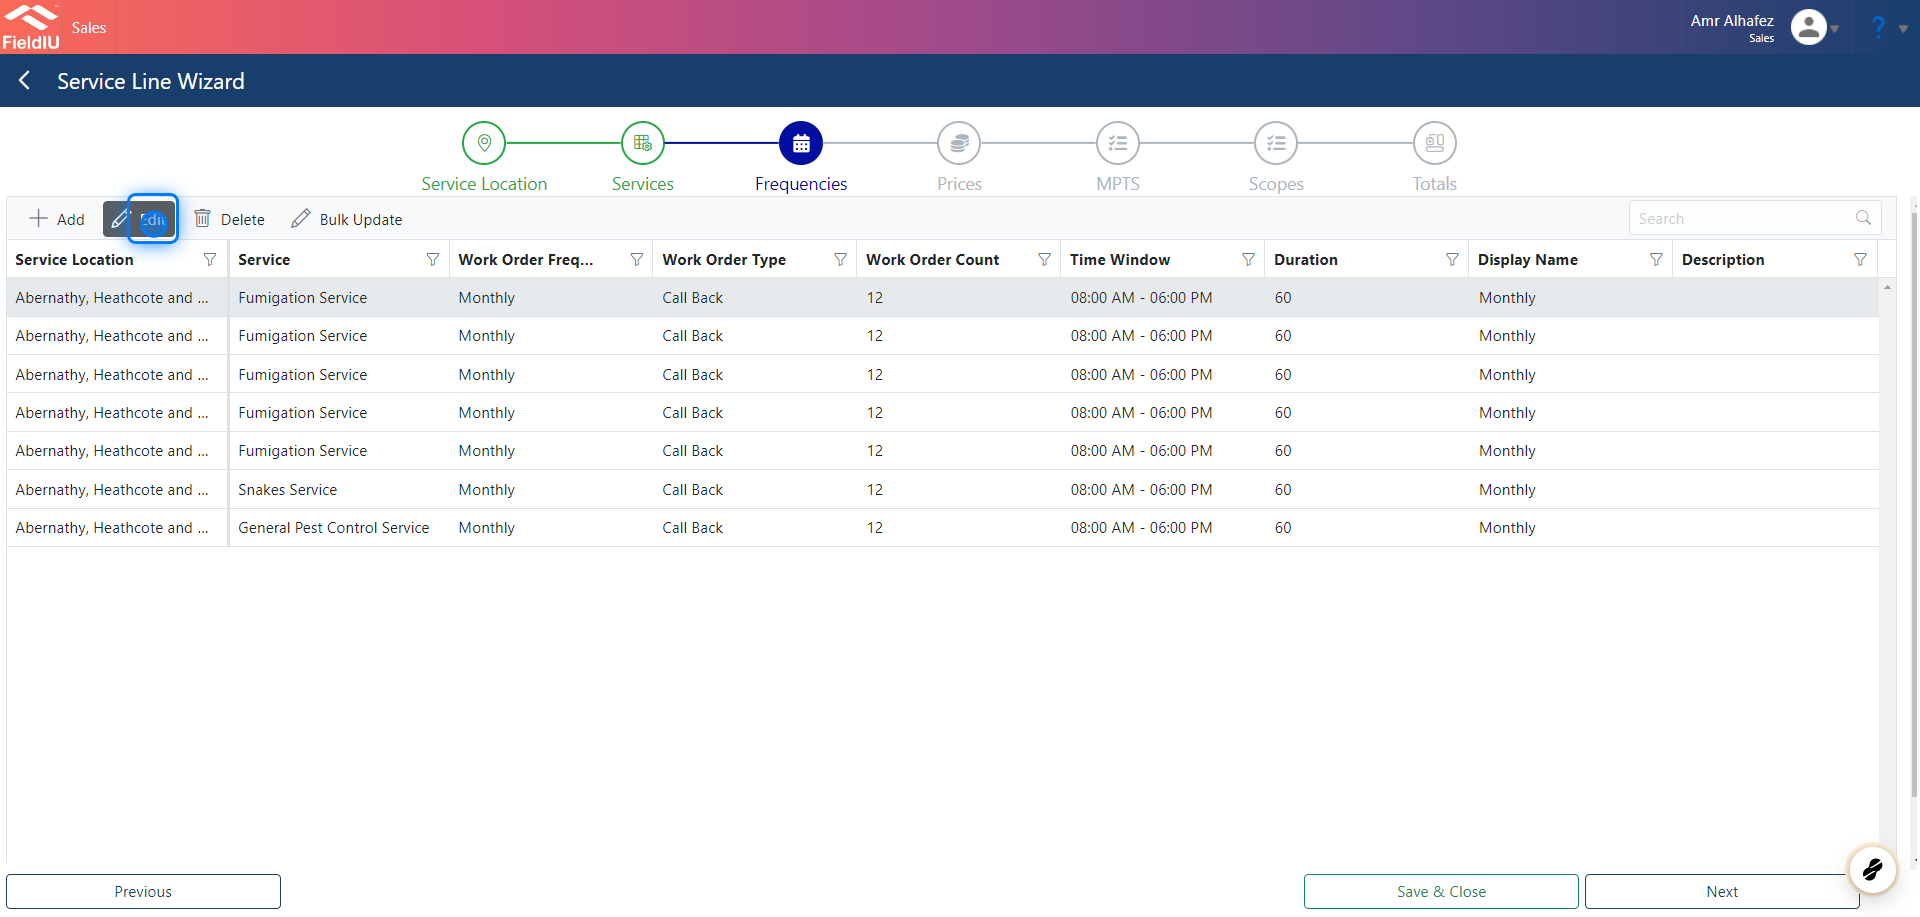
Editing the frequency is easy. Simply select the location and click on the "Edit" button.
### 8. Edit
Editing the frequency is easy. Simply select the location and click on the "Edit" button.
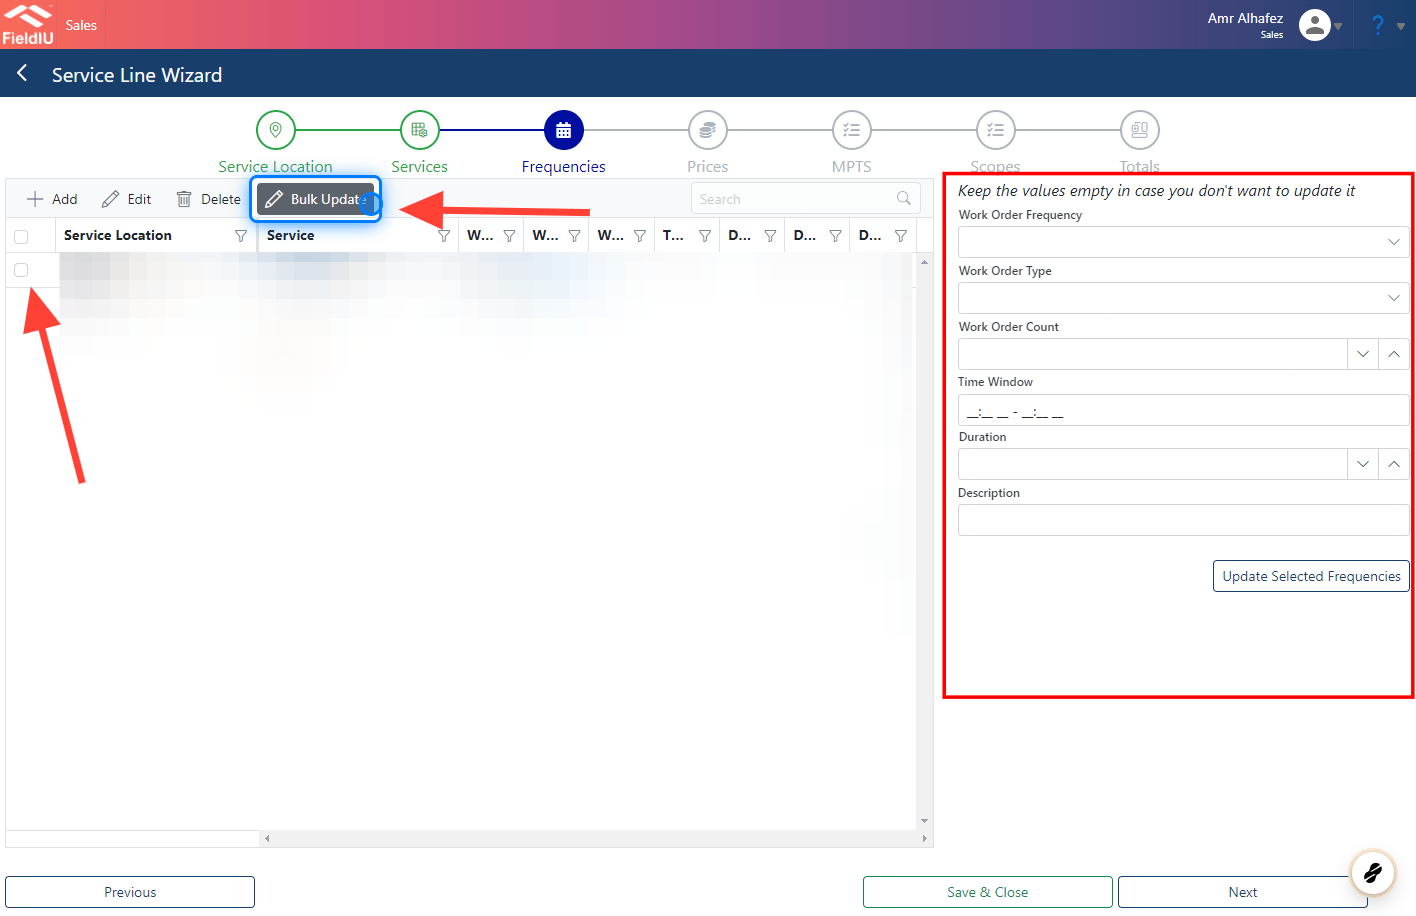
 ### 9. Bulk Update
You can bulk edit the selected frequencies by clicking on "Bulk Update" and filling in the fields.
*Leave a field empty if you don’t want to update that specific frequency.*
### 9. Bulk Update
You can bulk edit the selected frequencies by clicking on "Bulk Update" and filling in the fields.
*Leave a field empty if you don’t want to update that specific frequency.*
 > ### 💡 Pricing & Pricing Types
>
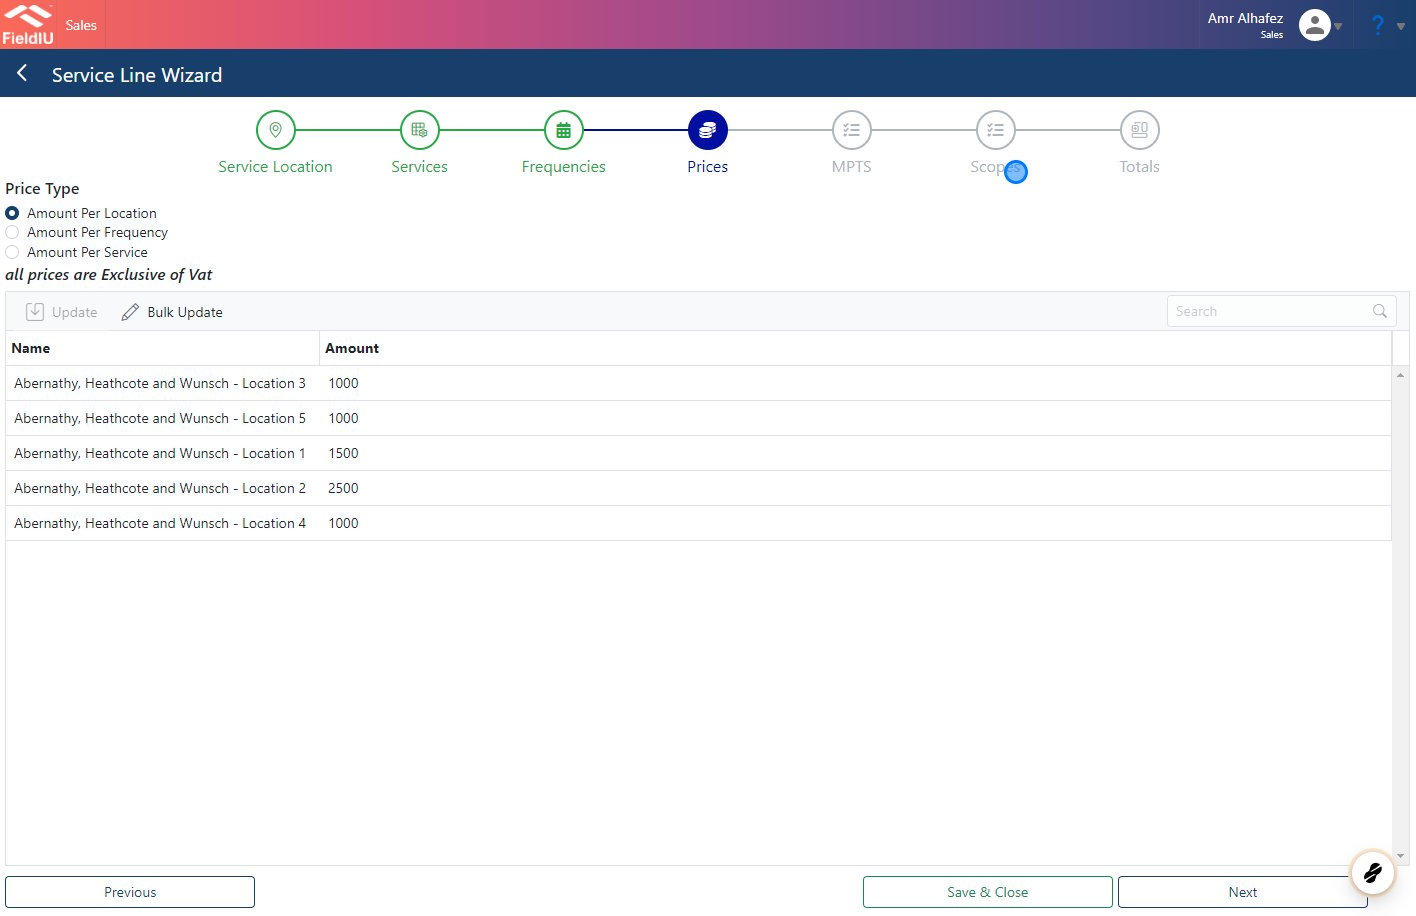
> In the Pricing step, you have three price types:
>
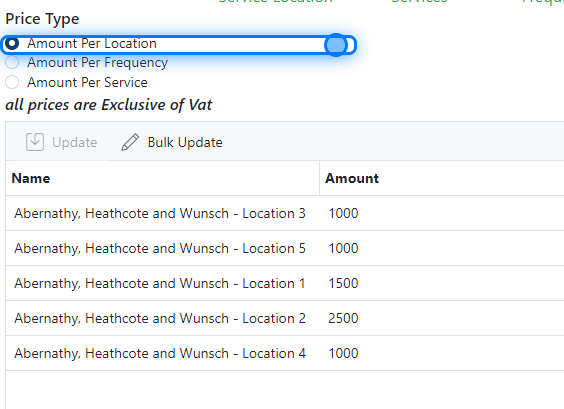
> 1. **Amount Per Location** : Pricing is based on the location, regardless of the service.
>
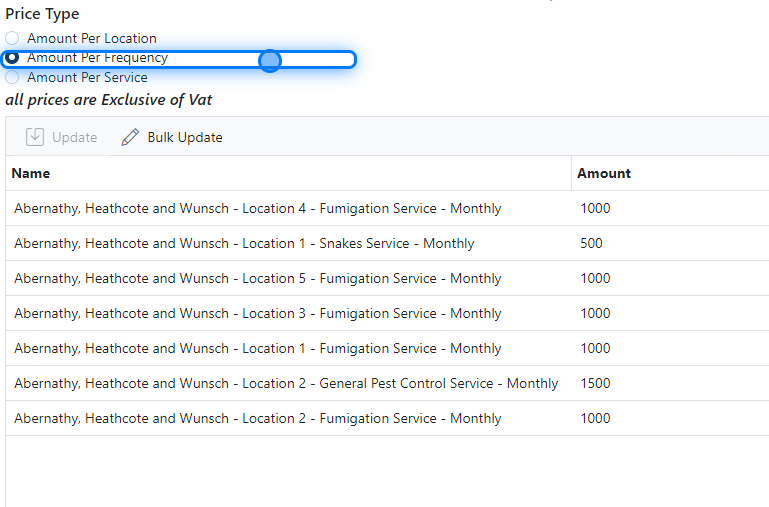
> 2. **Amount Per Frequency** : Pricing is based on the frequency, regardless of the service.
>
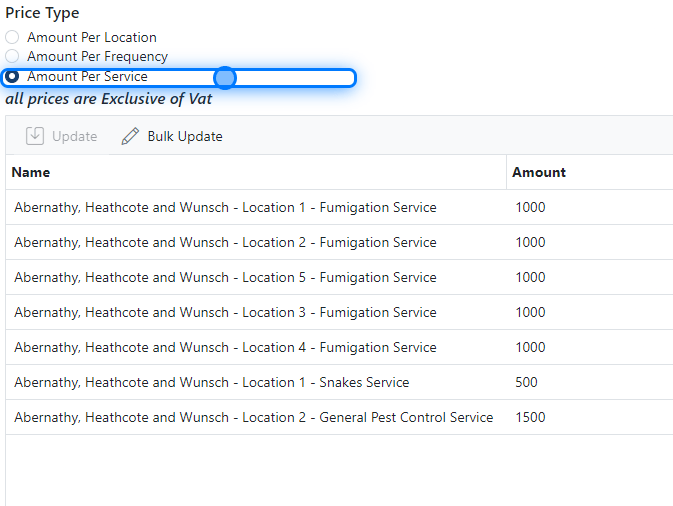
> 3. **Amount Per Service** : Pricing is based on the service, regardless of the location or frequency.
### 10. Mian Screen
> ### 💡 Pricing & Pricing Types
>
> In the Pricing step, you have three price types:
>
> 1. **Amount Per Location** : Pricing is based on the location, regardless of the service.
>
> 2. **Amount Per Frequency** : Pricing is based on the frequency, regardless of the service.
>
> 3. **Amount Per Service** : Pricing is based on the service, regardless of the location or frequency.
### 10. Mian Screen
 ### 11. Amount Per Location
 ### 12. Amount Per Frequency
 ### 13. Amount Per Service
 ### 14. Bulk Edit
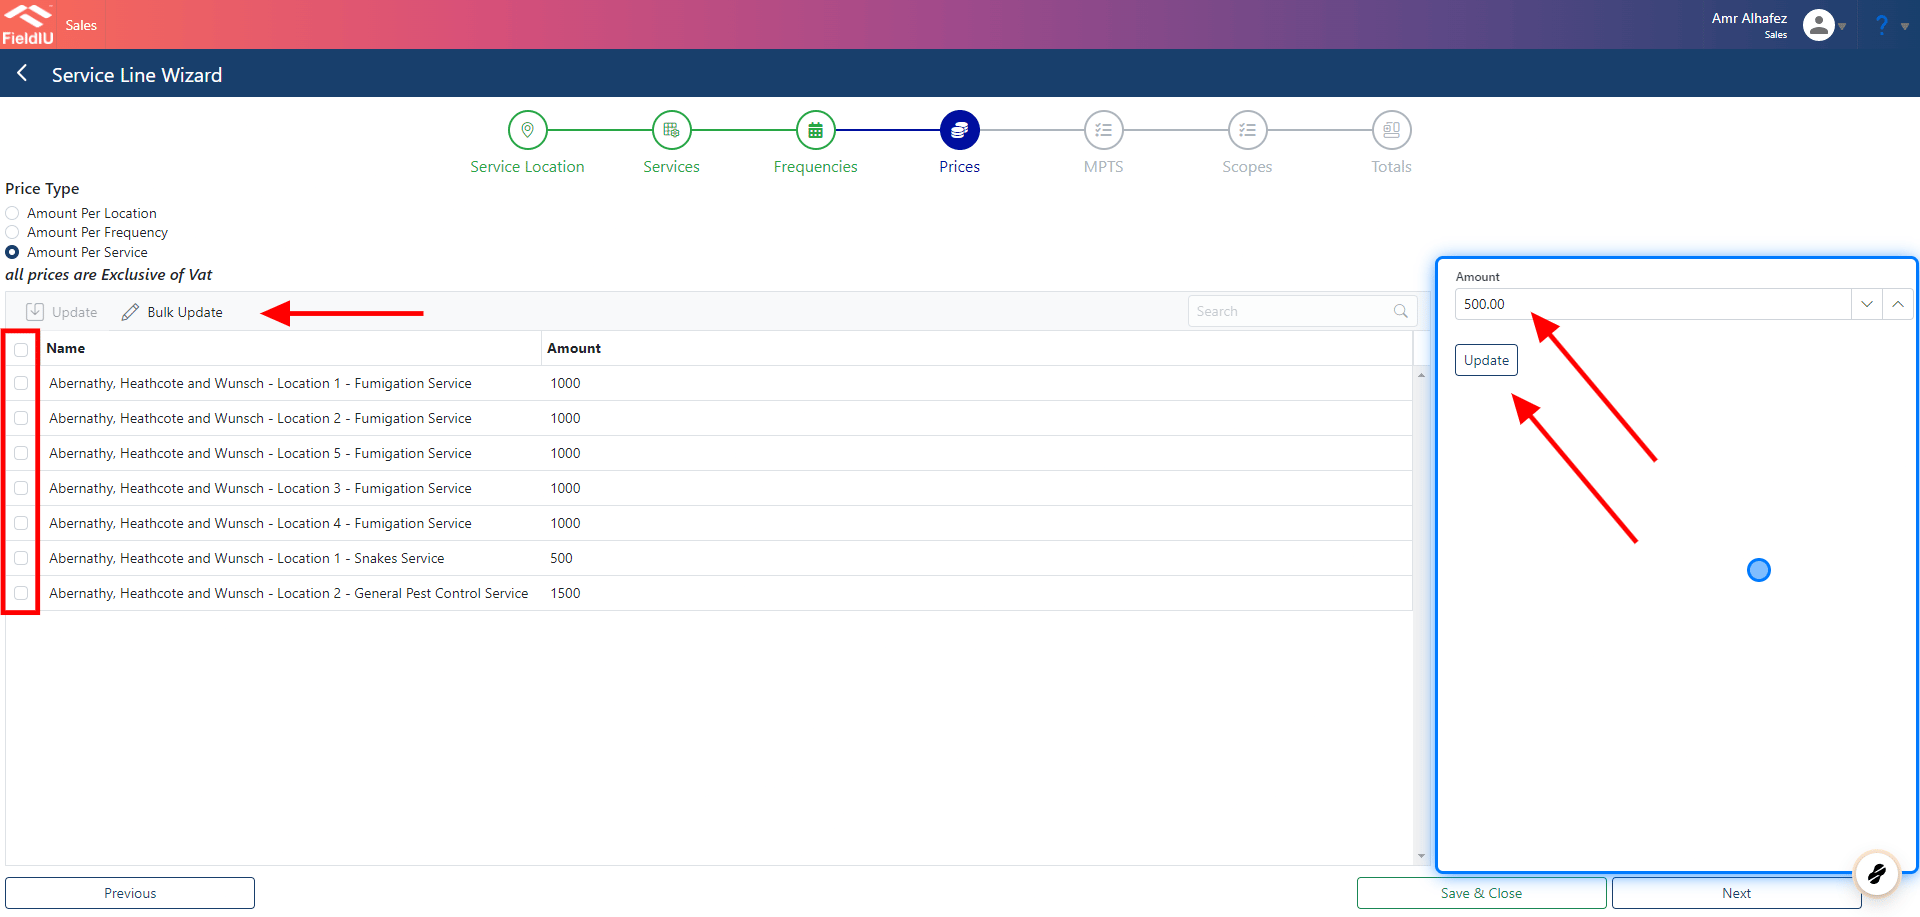
You can also bulk edit the prices by following these steps:
1. Click on the "Bulk Edit" button.
2. Select the items you want to edit.
3. Enter the amount.
4. Press "Update" to apply the changes.
### 14. Bulk Edit
You can also bulk edit the prices by following these steps:
1. Click on the "Bulk Edit" button.
2. Select the items you want to edit.
3. Enter the amount.
4. Press "Update" to apply the changes.
 ### 15. Monitoring Points
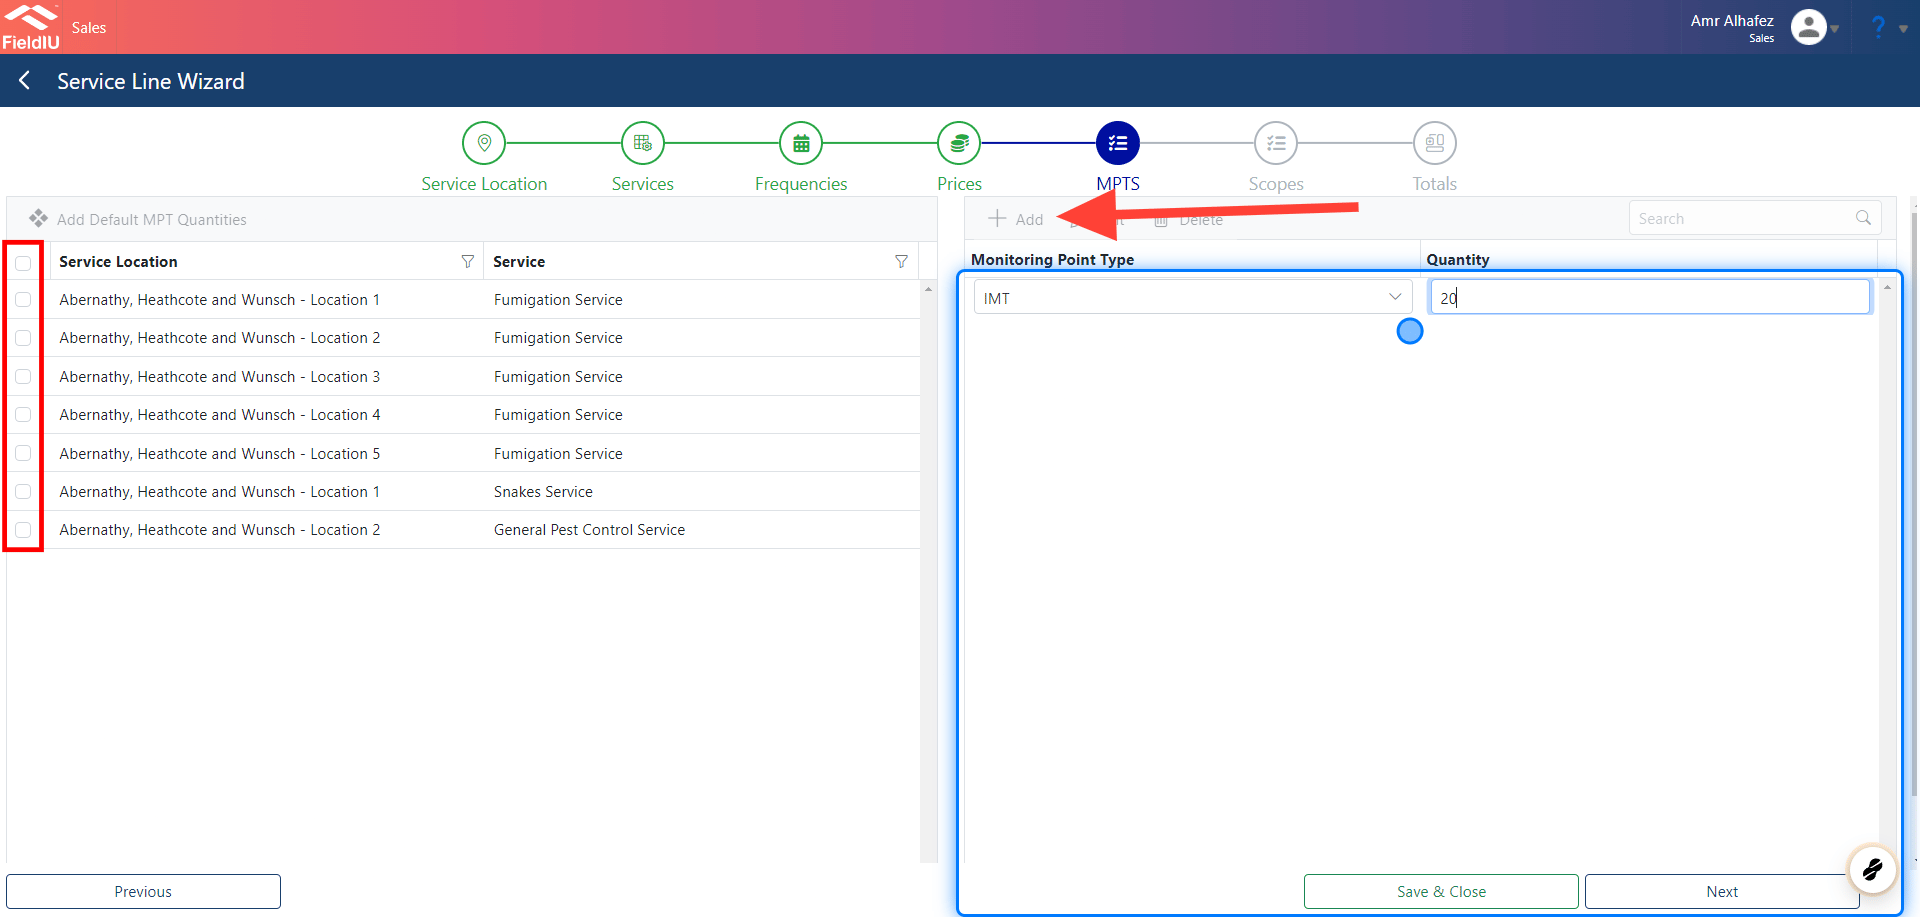
You can add monitoring points for the service locations.
For example, if you want to add "20 IMT" for the selected locations, you can do so in this step.
All you have to do is select the locations, then press the "Add" button.
Next, select the monitoring point and enter the quantity.
### 15. Monitoring Points
You can add monitoring points for the service locations.
For example, if you want to add "20 IMT" for the selected locations, you can do so in this step.
All you have to do is select the locations, then press the "Add" button.
Next, select the monitoring point and enter the quantity.
 ### 16. Scopes
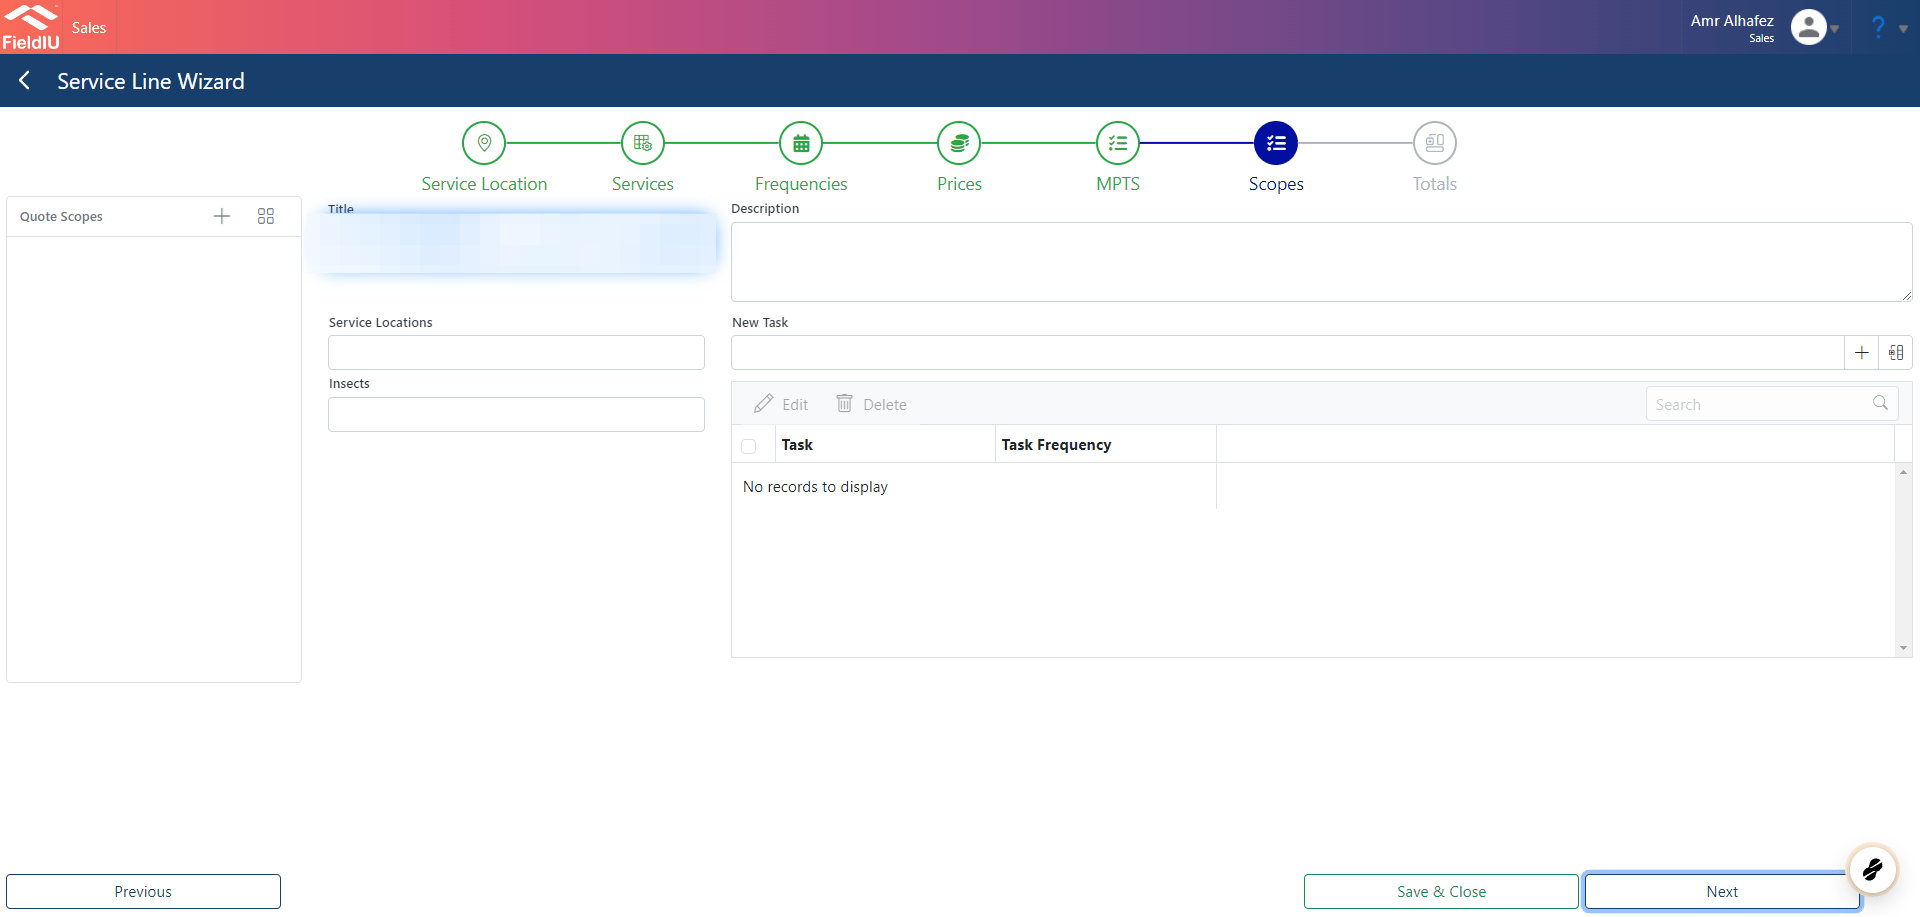
In this step, you can assign tasks for the field staff, including:
* The insects that should be scoped for each location.
* The tasks that they need to complete for the assigned locations.
### 16. Scopes
In this step, you can assign tasks for the field staff, including:
* The insects that should be scoped for each location.
* The tasks that they need to complete for the assigned locations.
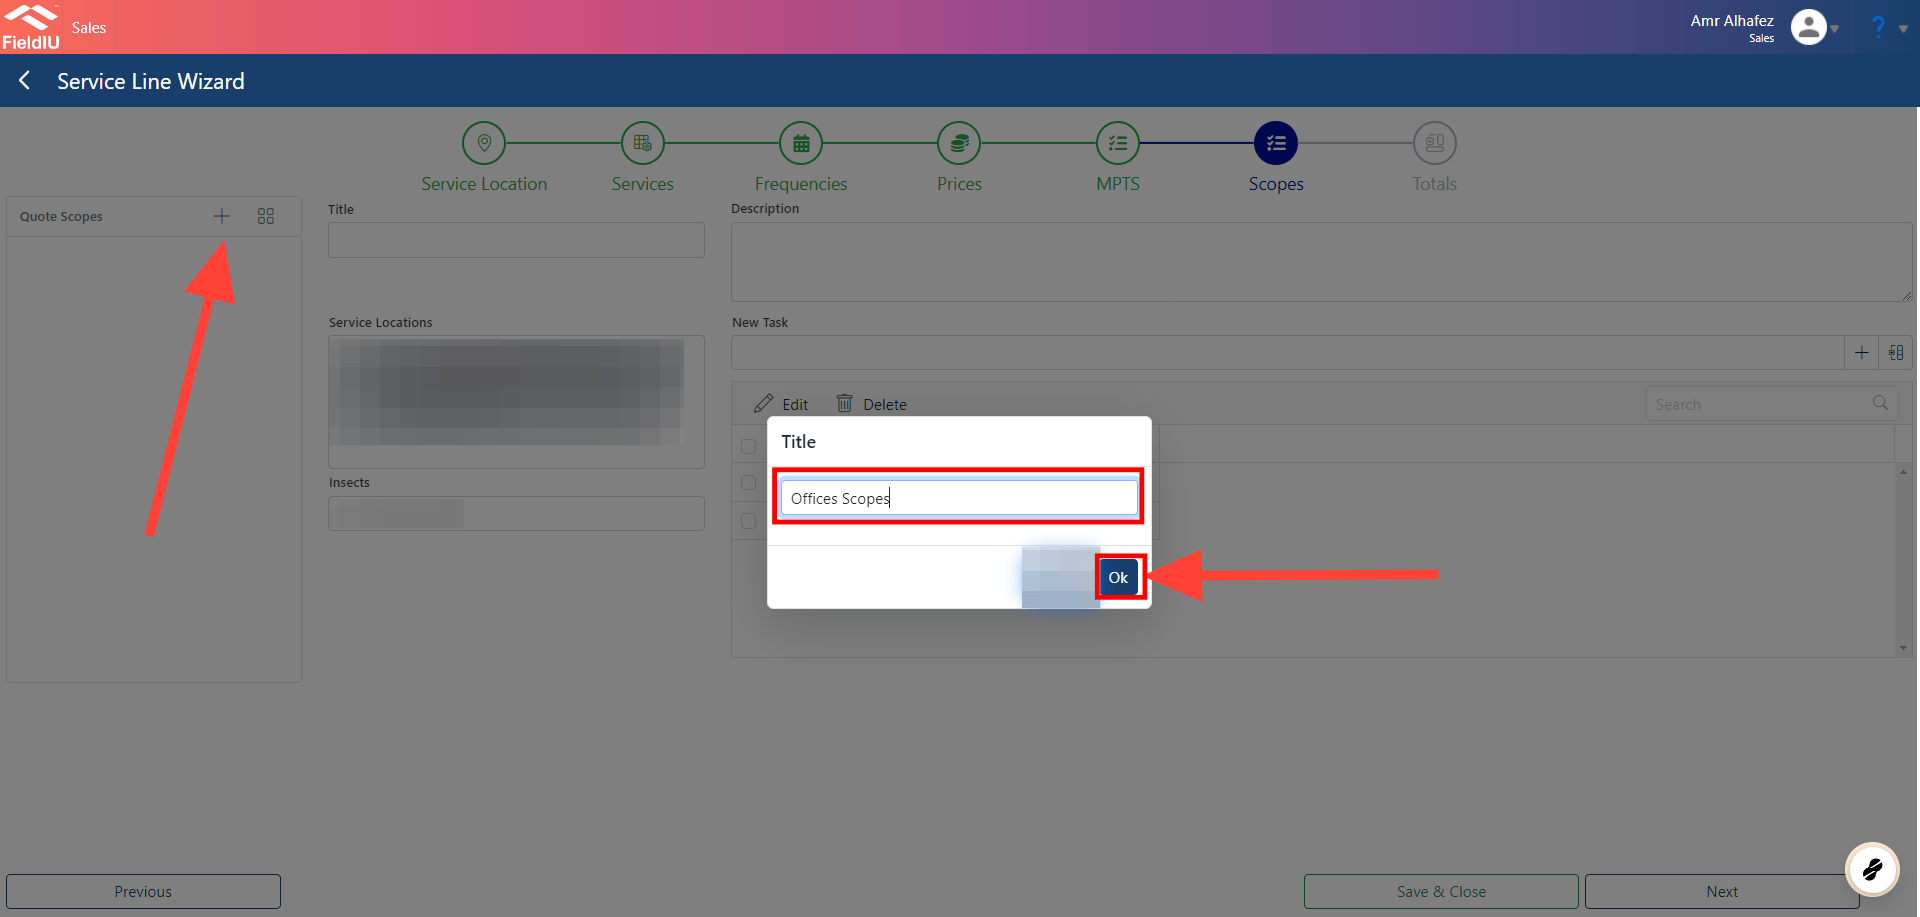
 ### 17. Quote Scopes Title
First, create the scope by clicking the "+" button for the quote scopes.
* Insert a title for the scope.
* Click "OK" to save it.
### 17. Quote Scopes Title
First, create the scope by clicking the "+" button for the quote scopes.
* Insert a title for the scope.
* Click "OK" to save it.
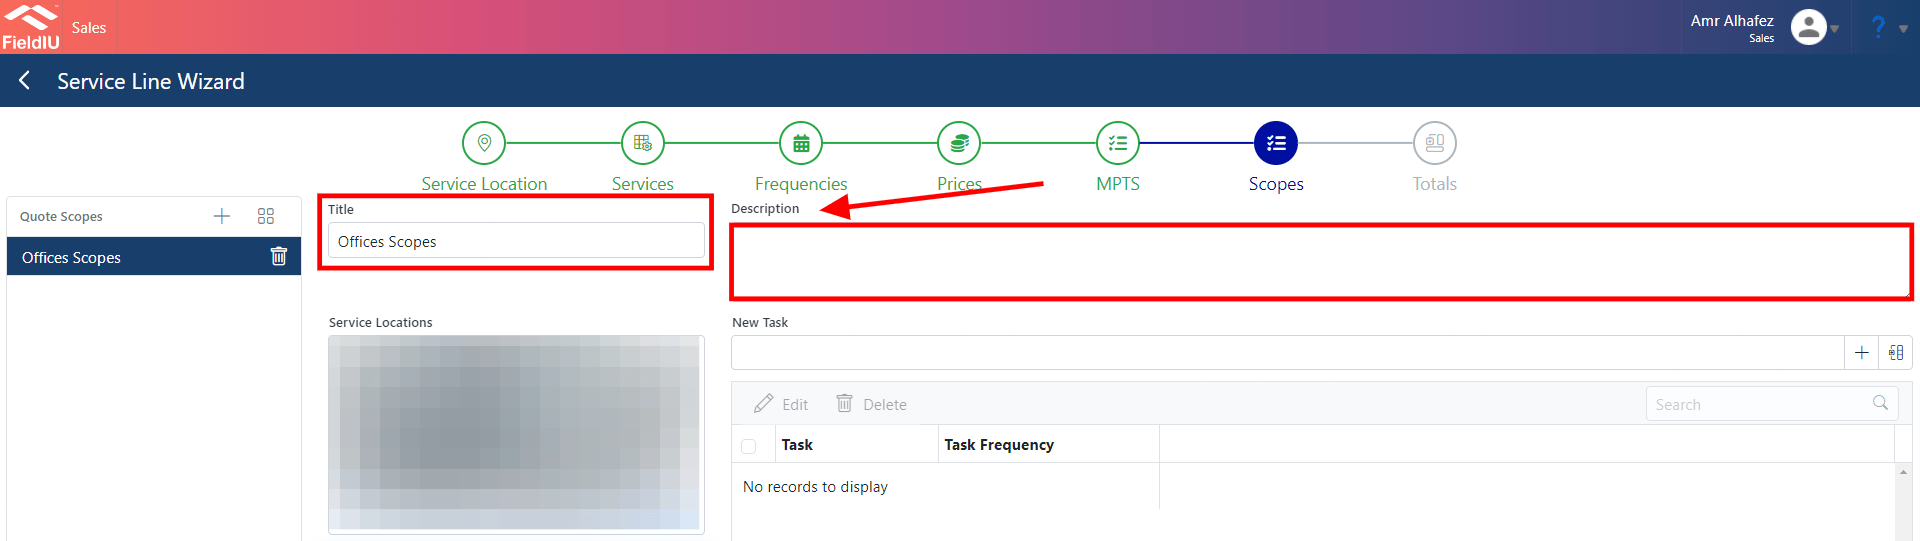
 ### 18. Title & Description
Insert a title for the task list.
*You can also add a description for it if needed.*
### 18. Title & Description
Insert a title for the task list.
*You can also add a description for it if needed.*
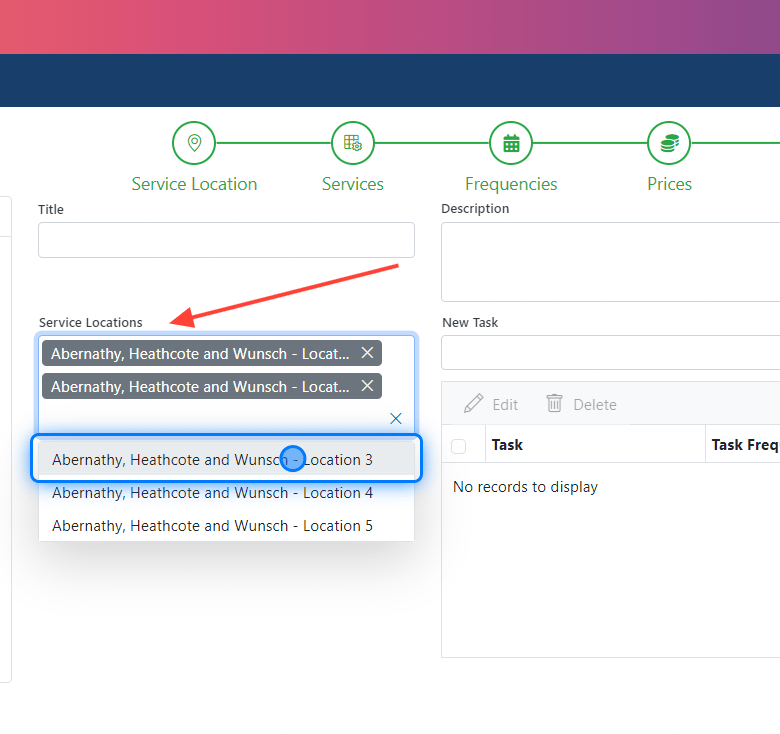
 ### 19. Service Locations
Here, you can select the service locations where you want to assign the task.
*You can select multiple locations for the same task.*
### 19. Service Locations
Here, you can select the service locations where you want to assign the task.
*You can select multiple locations for the same task.*
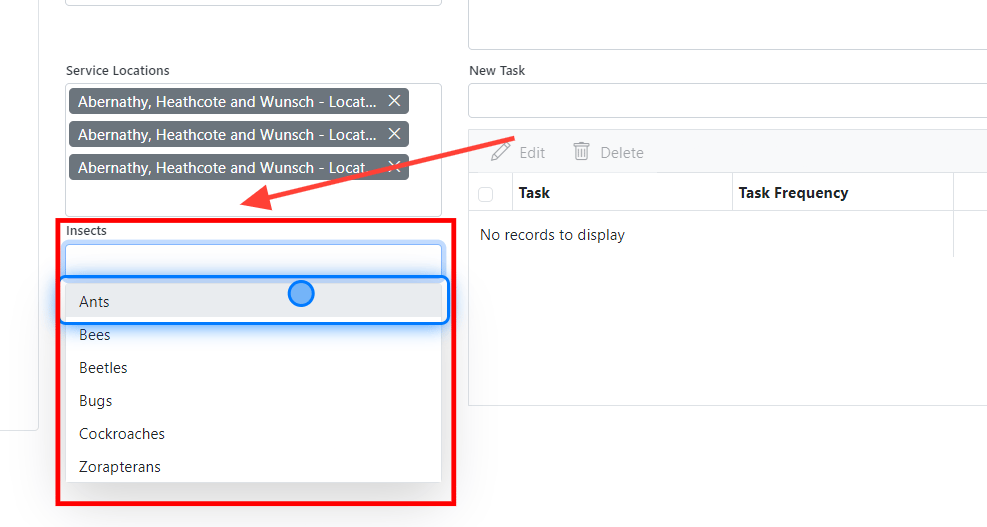
 ### 20. Insects
Similarly, for the insects, you can assign one or multiple insects to be scoped for the selected locations.
### 20. Insects
Similarly, for the insects, you can assign one or multiple insects to be scoped for the selected locations.
 ### 21. Adding Task
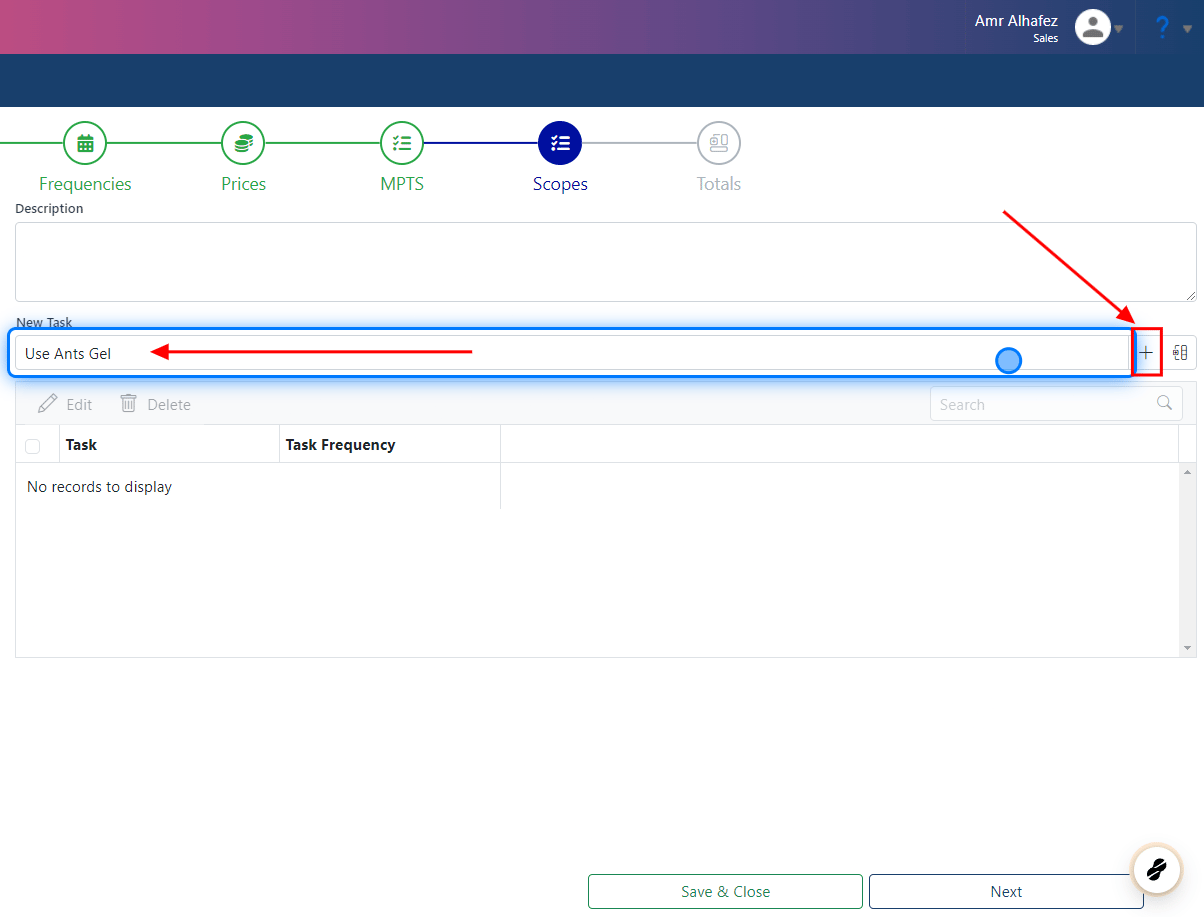
To add a task, simply insert the task in the "New Task" field, then press the "+" button to add it.
### 21. Adding Task
To add a task, simply insert the task in the "New Task" field, then press the "+" button to add it.
 ### 22. Task Frequency
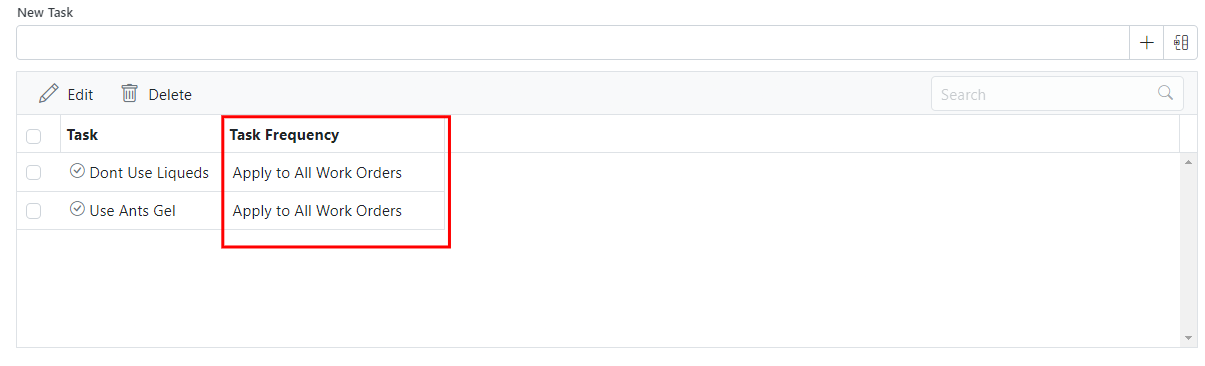
As we can see, there is a "Task Frequency" column in the task list. This helps you set a frequency for each task if needed.
### 22. Task Frequency
As we can see, there is a "Task Frequency" column in the task list. This helps you set a frequency for each task if needed.
 ### 23. Edit Task Frequency
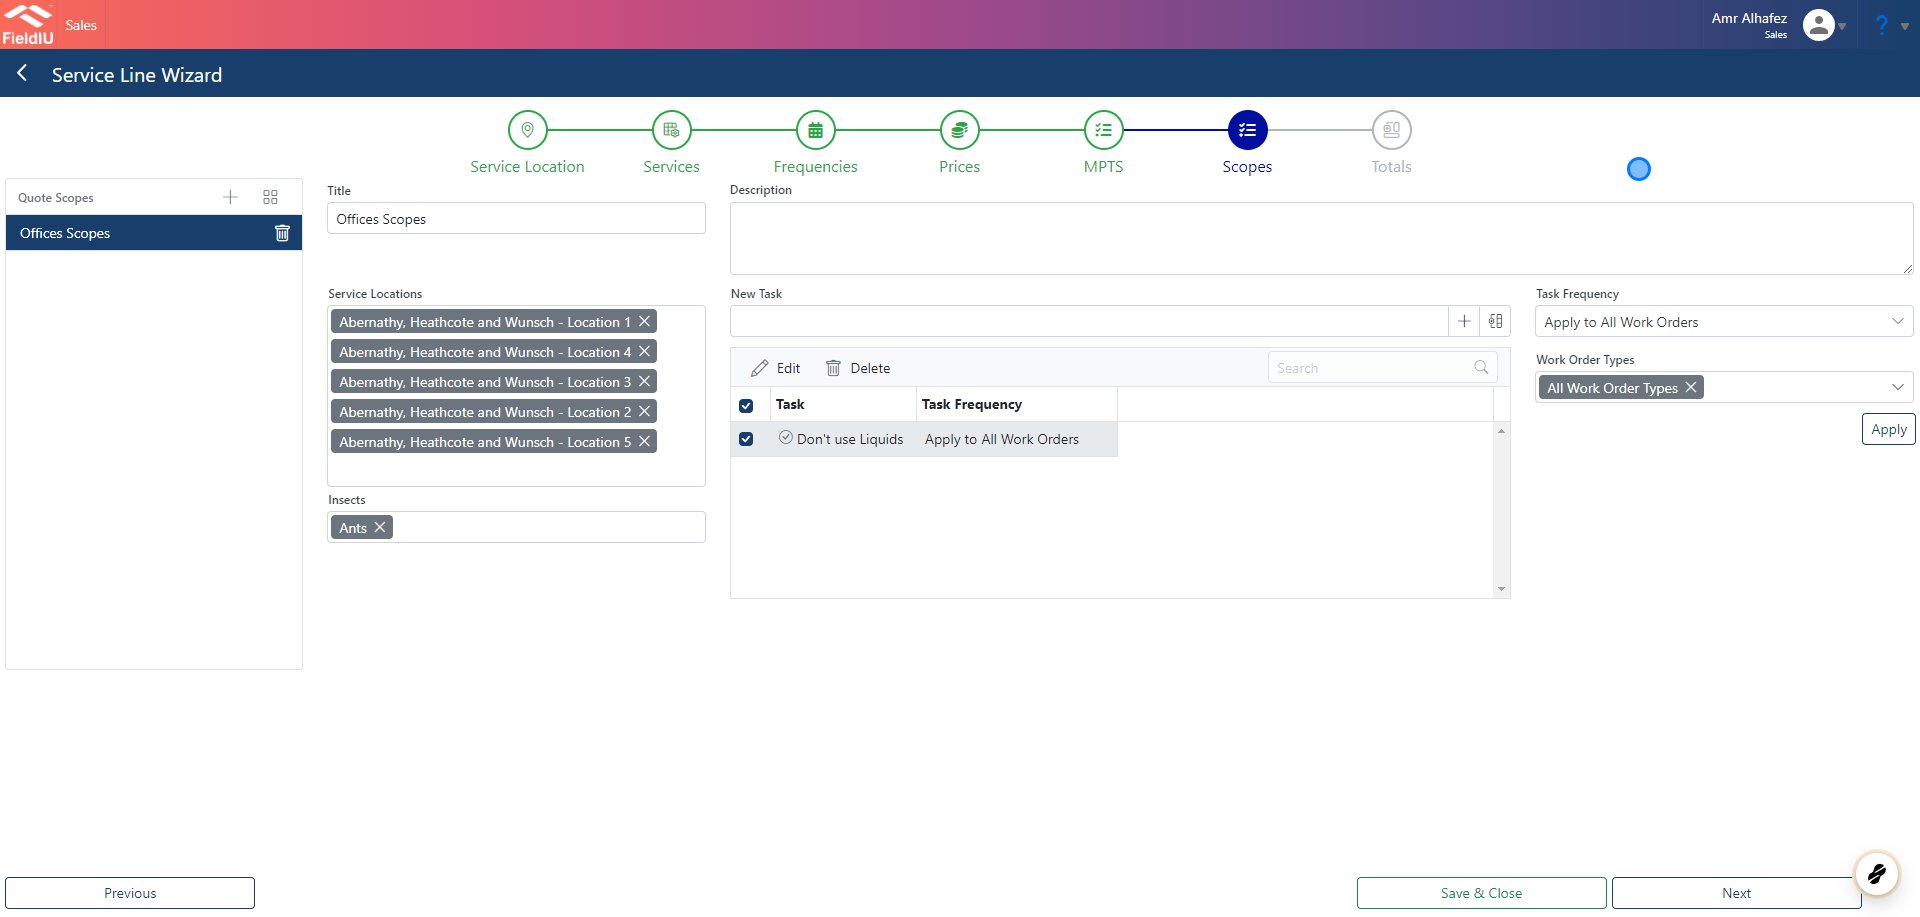
Easily select the task, and a new menu will open where you can insert the frequency and the work order type that will affect the task.
### 23. Edit Task Frequency
Easily select the task, and a new menu will open where you can insert the frequency and the work order type that will affect the task.
 ### 24. Frequencies
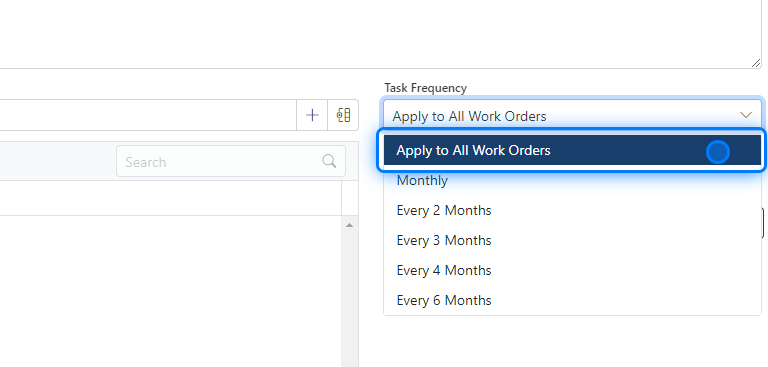
You can apply the task to all work orders by selecting **"Apply to all work orders"** as frequency.
Alternatively, you can choose a specific frequency from the following options:
* Monthly
* Every 2 months
* Every 3 months
* Every 4 months
* Every 6 months
### 24. Frequencies
You can apply the task to all work orders by selecting **"Apply to all work orders"** as frequency.
Alternatively, you can choose a specific frequency from the following options:
* Monthly
* Every 2 months
* Every 3 months
* Every 4 months
* Every 6 months
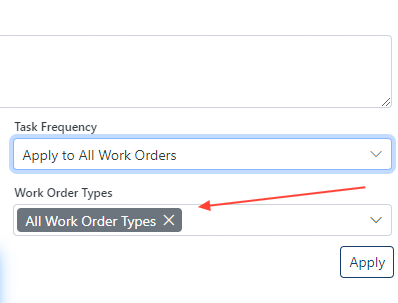
 ### 25. Work Order Types
You can also select one or more types together:
**Types:**
* All Work Order Types
* Regular
* Call Back
* Project
* Follow Up
### 25. Work Order Types
You can also select one or more types together:
**Types:**
* All Work Order Types
* Regular
* Call Back
* Project
* Follow Up
 ### 26. Totals
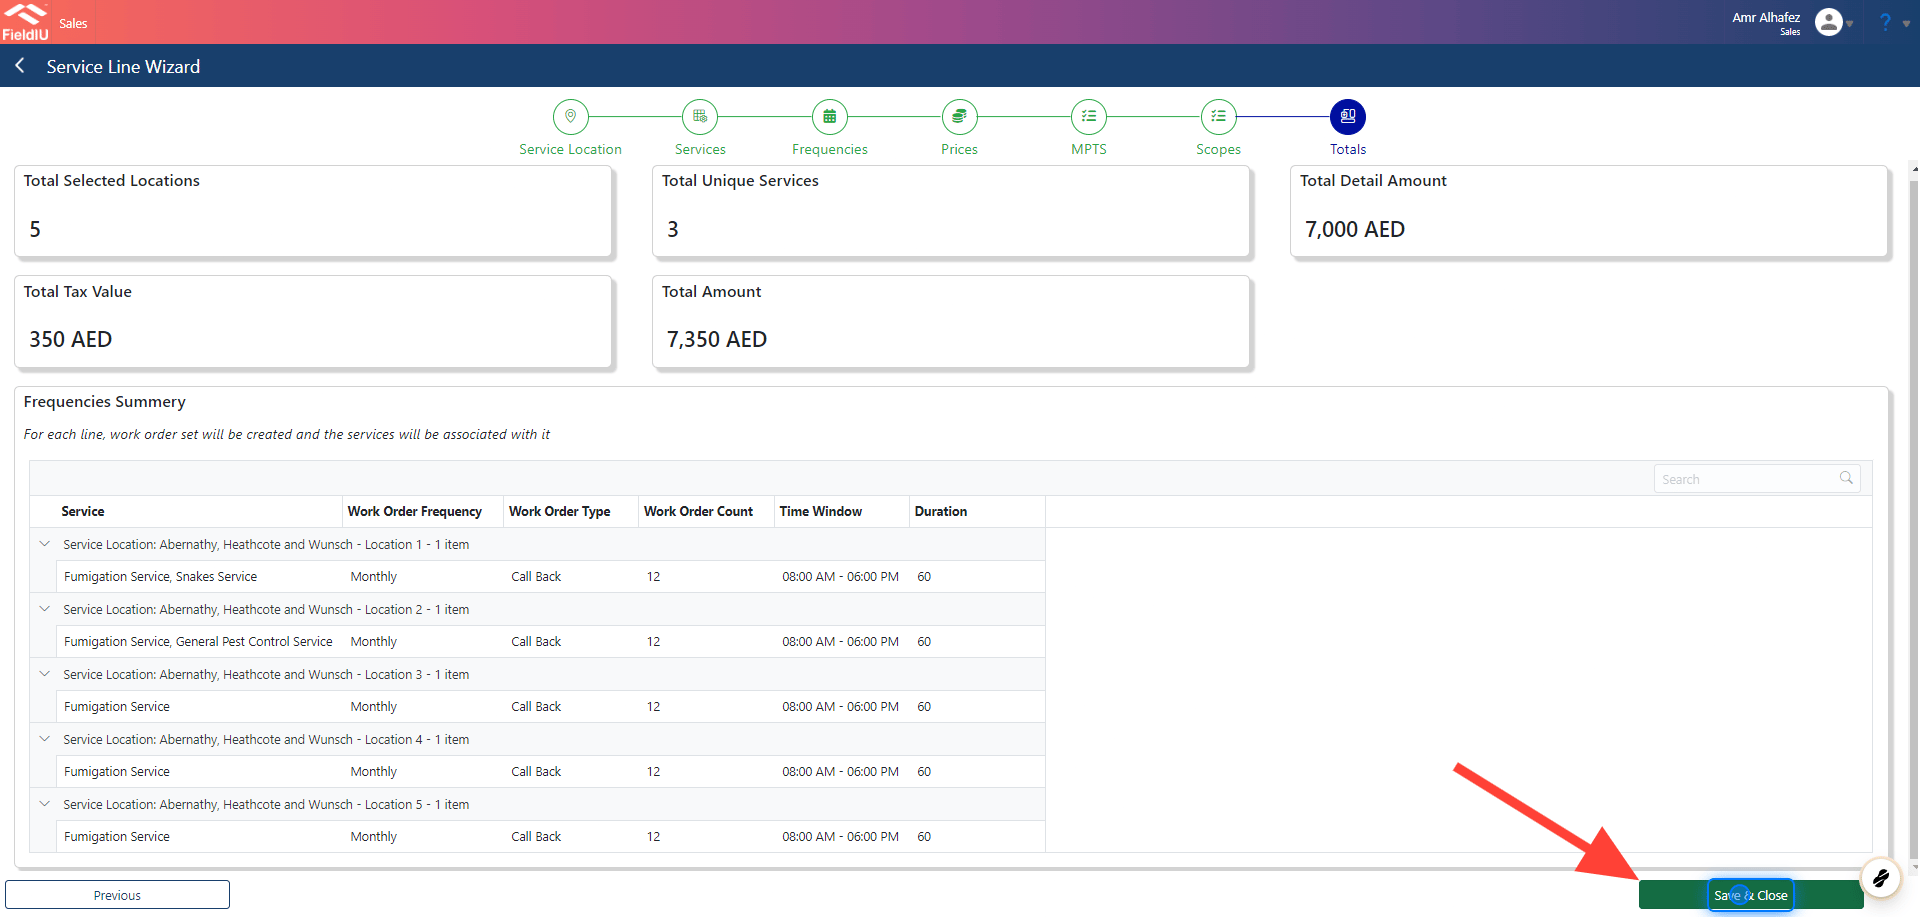
Finally, in the Totals step, you will see all the totals for the quote.
You can review and check them, then click "Save & Close" to finish the process.
### 26. Totals
Finally, in the Totals step, you will see all the totals for the quote.
You can review and check them, then click "Save & Close" to finish the process.
 ### 27. Review
Finally, you will find all the advanced details set in the main opportunity screen under the Service Lines section.
***Don't forget to save your changes.***
### 27. Review
Finally, you will find all the advanced details set in the main opportunity screen under the Service Lines section.
***Don't forget to save your changes.***
 �����������������������