> ## Documentation Index
> Fetch the complete documentation index at: https://docs.fieldiu.com/llms.txt
> Use this file to discover all available pages before exploring further.
# Mobile Application
> ### 💡 The app will help field staff view all their work orders and complete them easily.
>
> The app can work completely offline. All you need to do is sync to receive new data, such as work orders, and to submit your work once you're finished.
### 1.
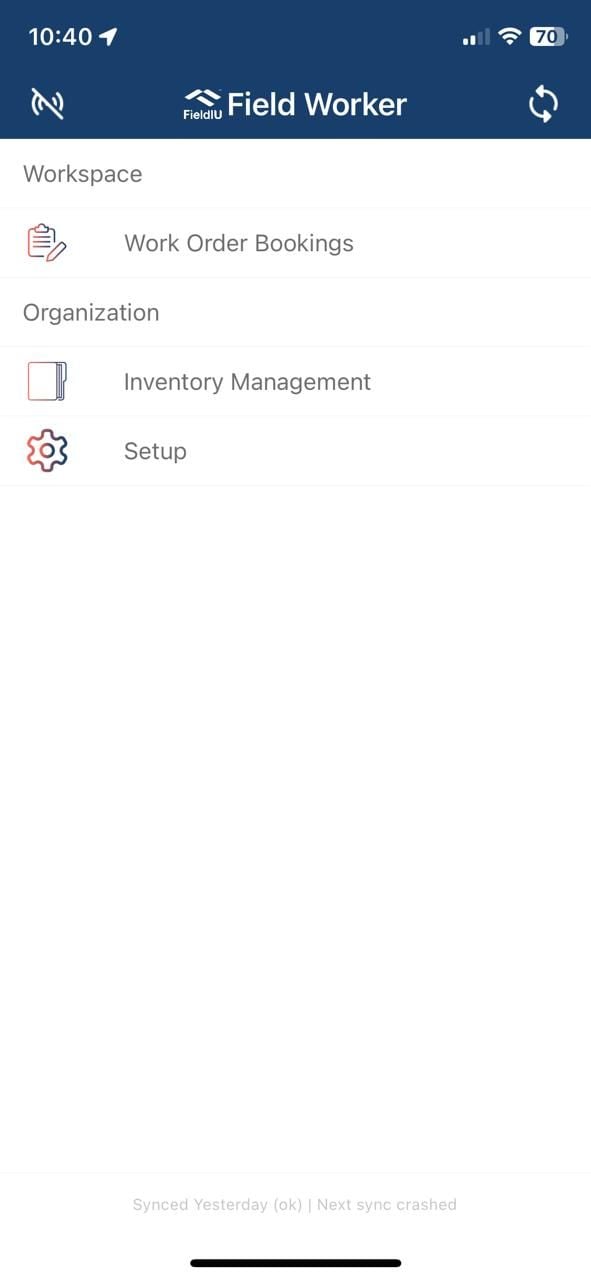 ### 2. Main Screen
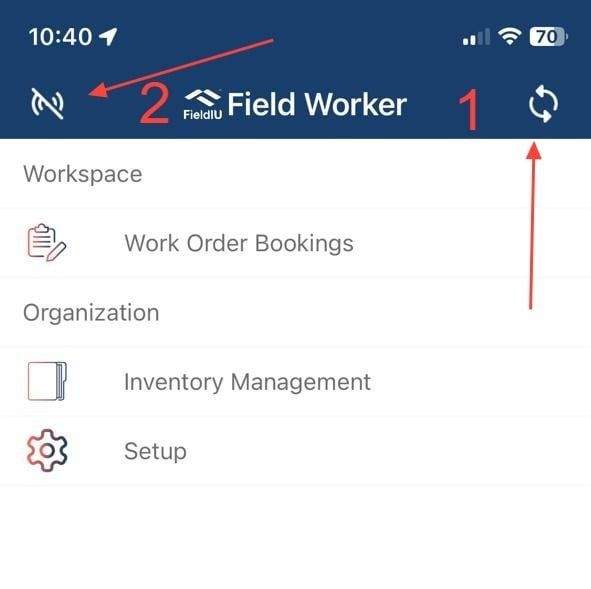
On the main screen, you’ll find two main buttons:
1. **Sync Button** : This button syncs all data from the server and updates the app, including work orders, products, etc. It also uploads any work completed while the app was offline.
2. **Online & Offline Button** : By clicking this button, you can toggle the app between online and offline modes.
Additionally, there are three tabs:
1. **Work Order Booking** : Here, you can view all the work orders assigned to you as field staff.
2. **Inventory Management** : This section allows you to manage your inventory, including making transfers and transfer requests (we will explain this in detail later).
3. **Setup** : This is where you manage the app preferences and input the main settings. The setup is typically completed once when you first start the app, including entering your username and password.
### 2. Main Screen
On the main screen, you’ll find two main buttons:
1. **Sync Button** : This button syncs all data from the server and updates the app, including work orders, products, etc. It also uploads any work completed while the app was offline.
2. **Online & Offline Button** : By clicking this button, you can toggle the app between online and offline modes.
Additionally, there are three tabs:
1. **Work Order Booking** : Here, you can view all the work orders assigned to you as field staff.
2. **Inventory Management** : This section allows you to manage your inventory, including making transfers and transfer requests (we will explain this in detail later).
3. **Setup** : This is where you manage the app preferences and input the main settings. The setup is typically completed once when you first start the app, including entering your username and password.
 ## Work Orders
> ### ⚠️ Sync !
>
> Remember to sync the app to receive all the new work orders assigned to you.
### 3. Work Order Bookings
Once you click on the 'Work Order Bookings' tab, a new screen will open, displaying a list of all the bookings assigned to you. Additionally, you have a calendar view that allows you to see your work orders by month, week, or day.
*The work order record contains the main details for each booking.*
## Work Orders
> ### ⚠️ Sync !
>
> Remember to sync the app to receive all the new work orders assigned to you.
### 3. Work Order Bookings
Once you click on the 'Work Order Bookings' tab, a new screen will open, displaying a list of all the bookings assigned to you. Additionally, you have a calendar view that allows you to see your work orders by month, week, or day.
*The work order record contains the main details for each booking.*
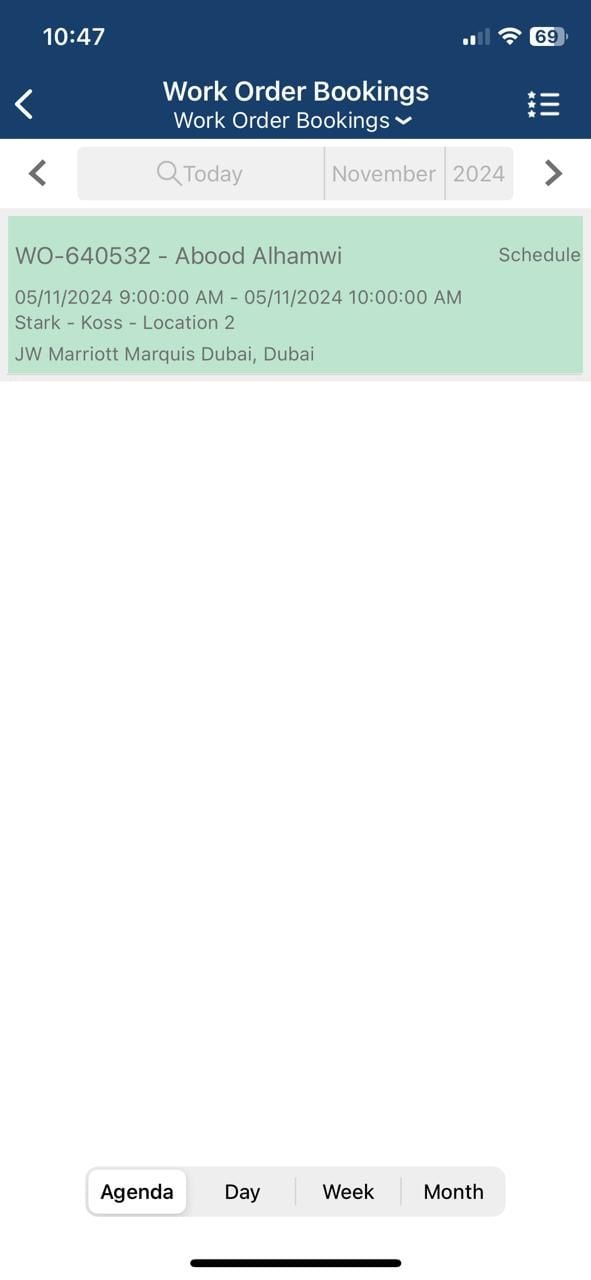 > ### 💡 Colored Booking
>
> All the bookings are color-coded to indicate their status. For example, green represents a 'Scheduled' status.
### 4. Booking Details
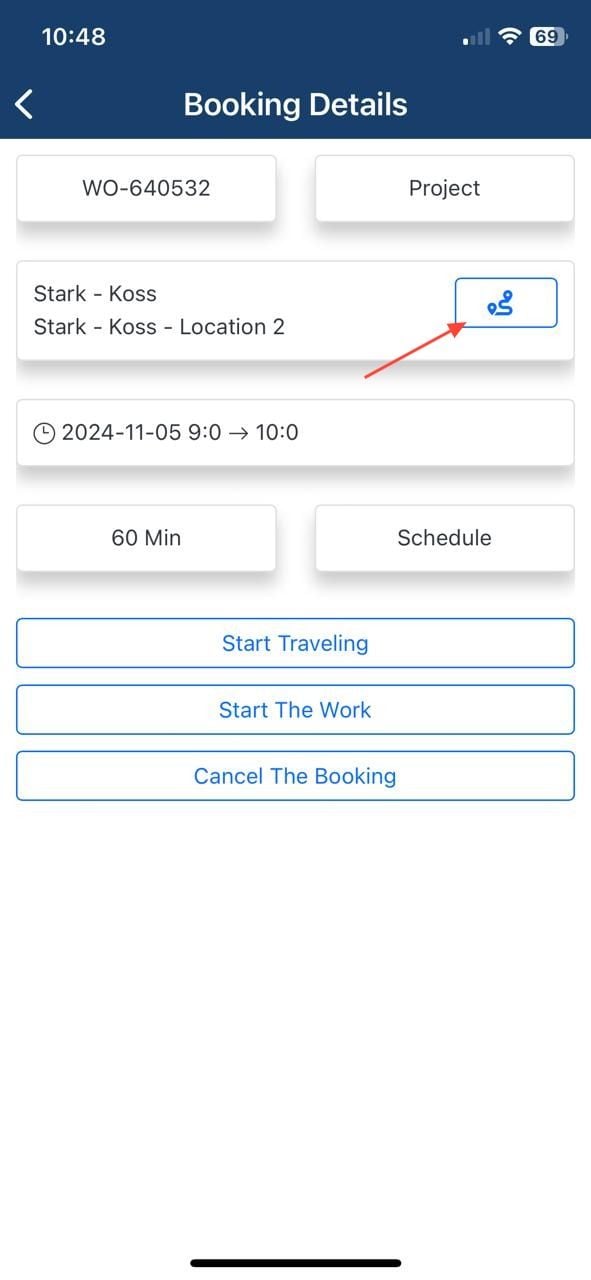
When you select a booking, you will see the following details:
* **Name**
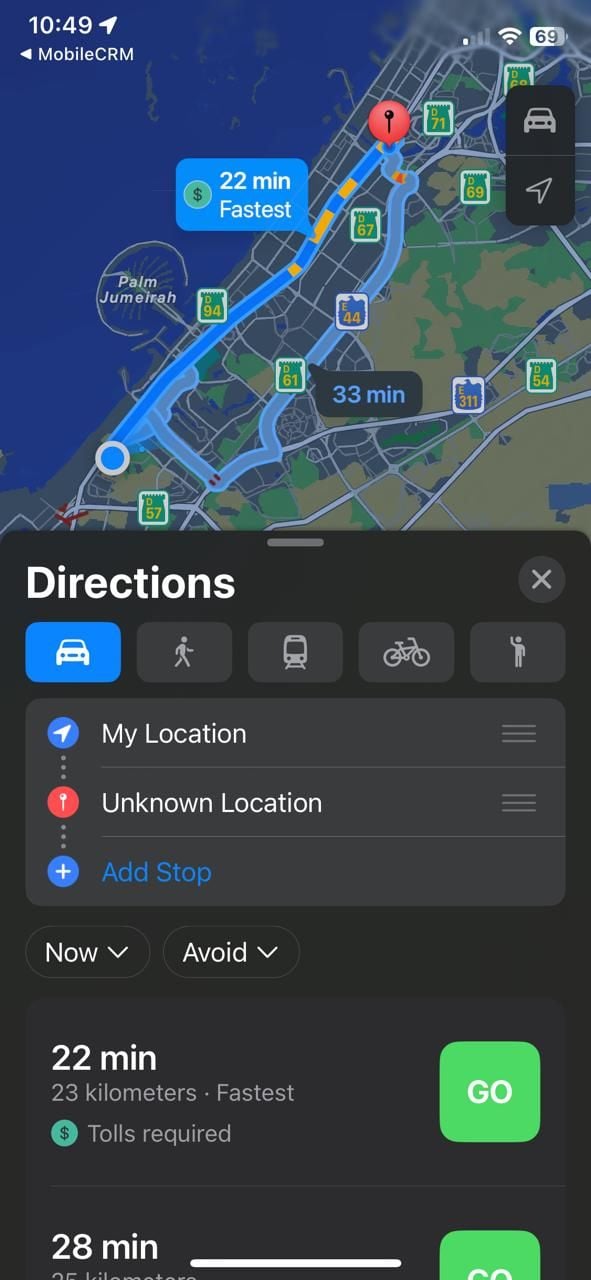
* **Location** : You can click on the location icon to open the location in your navigation app.
* **Booking Time**
* **Duration**
* **Status**
Additionally, there are 3 action buttons:
1. **Start Traveling** : Click this button once you begin traveling to the location.
2. **Start the Work** : Click this button once you start working at the location.
3. **Cancel the Booking** : If the customer wants to cancel the booking, you can easily cancel it by clicking the "Cancel" button.
> ### 💡 Colored Booking
>
> All the bookings are color-coded to indicate their status. For example, green represents a 'Scheduled' status.
### 4. Booking Details
When you select a booking, you will see the following details:
* **Name**
* **Location** : You can click on the location icon to open the location in your navigation app.
* **Booking Time**
* **Duration**
* **Status**
Additionally, there are 3 action buttons:
1. **Start Traveling** : Click this button once you begin traveling to the location.
2. **Start the Work** : Click this button once you start working at the location.
3. **Cancel the Booking** : If the customer wants to cancel the booking, you can easily cancel it by clicking the "Cancel" button.
 ### 5. Clicking On the Location Icon
 ### 6. Tasks
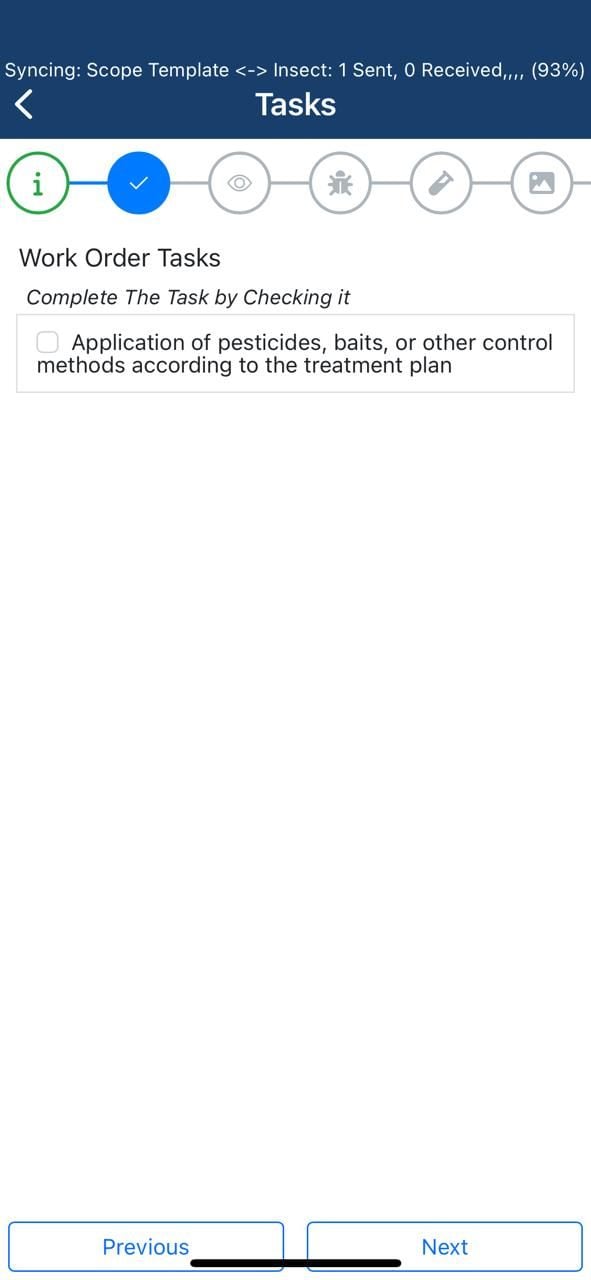
Once you start the work, you will see the tasks that need to be completed at this service location.
Each task has a checkbox that you can click once you've completed it.
### 6. Tasks
Once you start the work, you will see the tasks that need to be completed at this service location.
Each task has a checkbox that you can click once you've completed it.
 ### 7. Monitoring Points
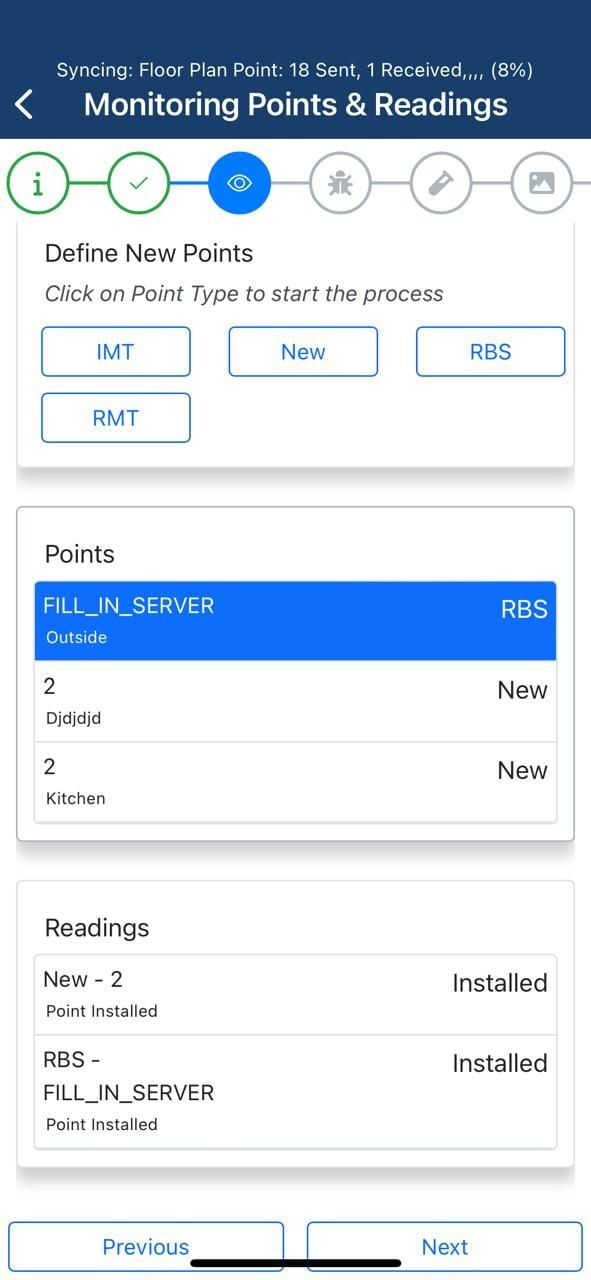
In the Monitoring Points window, you will see three sections:
1. **Define New Point** : This section allows you to define a new monitoring point.
2. **Points** : This section displays the service location points that have already been defined.
3. **Readings** : This section shows the readings for each point you have selected.
### 7. Monitoring Points
In the Monitoring Points window, you will see three sections:
1. **Define New Point** : This section allows you to define a new monitoring point.
2. **Points** : This section displays the service location points that have already been defined.
3. **Readings** : This section shows the readings for each point you have selected.
 ### 8. Readings
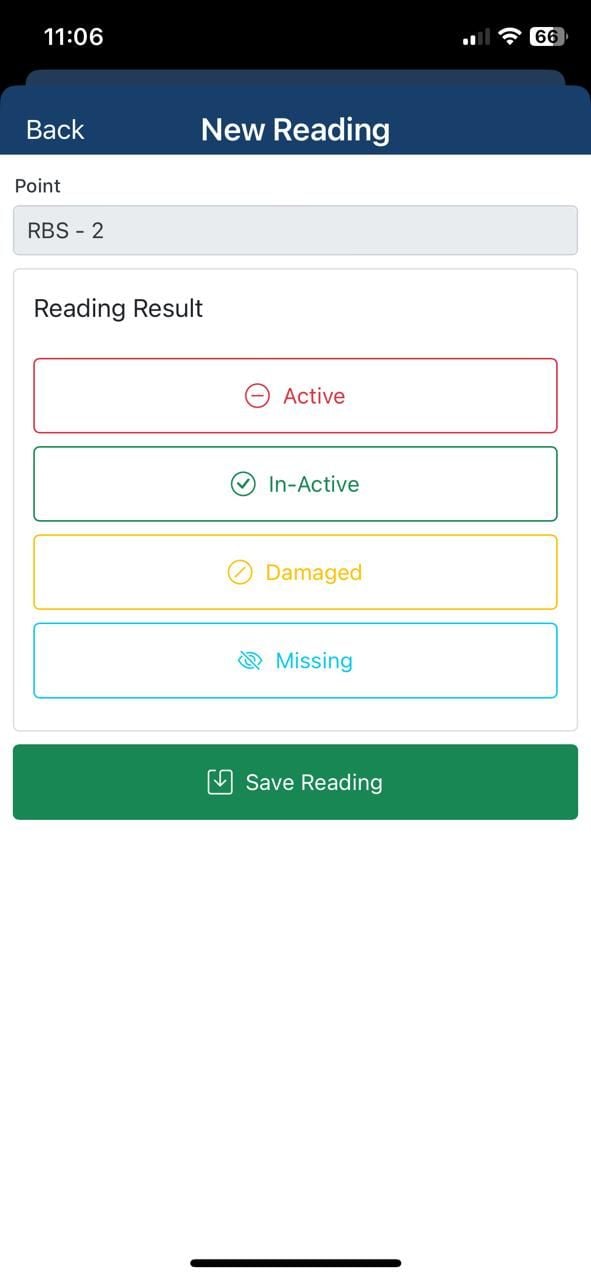
To create a new reading, click on the point for which you want to take the reading.
After clicking on the point, a new window will open, displaying all available readings. You can then select the reading you want for that point.
### 8. Readings
To create a new reading, click on the point for which you want to take the reading.
After clicking on the point, a new window will open, displaying all available readings. You can then select the reading you want for that point.
 > ### 💡 Active
>
> We will use 'Active' as the reading in our example.
### 9. Active Reading
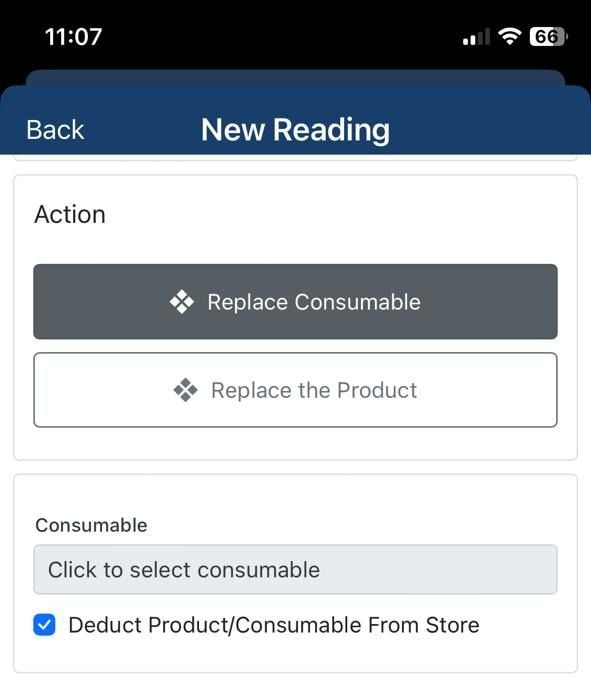
‘Active’ means that there is something inside the point.
When you choose the action you want, a new section will appear, including the following:
1. **Action** : This section allows you to select the action you have taken. In our case, we will select "Replace Consumable."
2. **Consumable** : This section lets you select the consumable product or chemical you used. You can choose to "Deduct Product/Consumable from Store," which will automatically update the inventory.
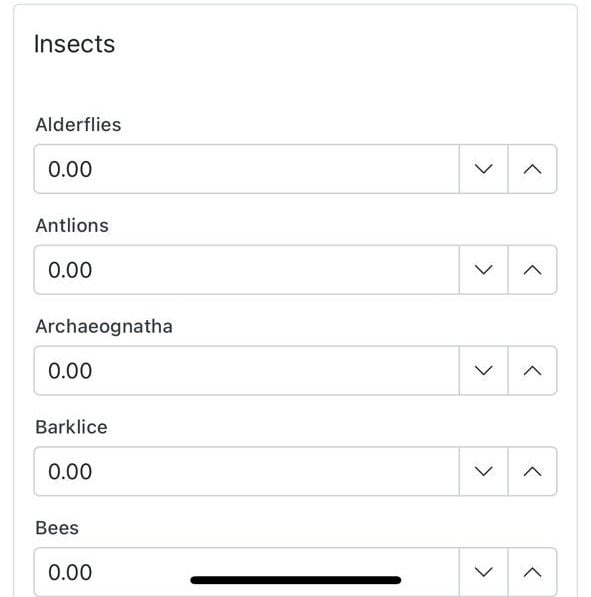
3. **Insect** : In this section, you will add any insect or rodent you find at the monitoring point.
> ### 💡 Active
>
> We will use 'Active' as the reading in our example.
### 9. Active Reading
‘Active’ means that there is something inside the point.
When you choose the action you want, a new section will appear, including the following:
1. **Action** : This section allows you to select the action you have taken. In our case, we will select "Replace Consumable."
2. **Consumable** : This section lets you select the consumable product or chemical you used. You can choose to "Deduct Product/Consumable from Store," which will automatically update the inventory.
3. **Insect** : In this section, you will add any insect or rodent you find at the monitoring point.
 ### 10.
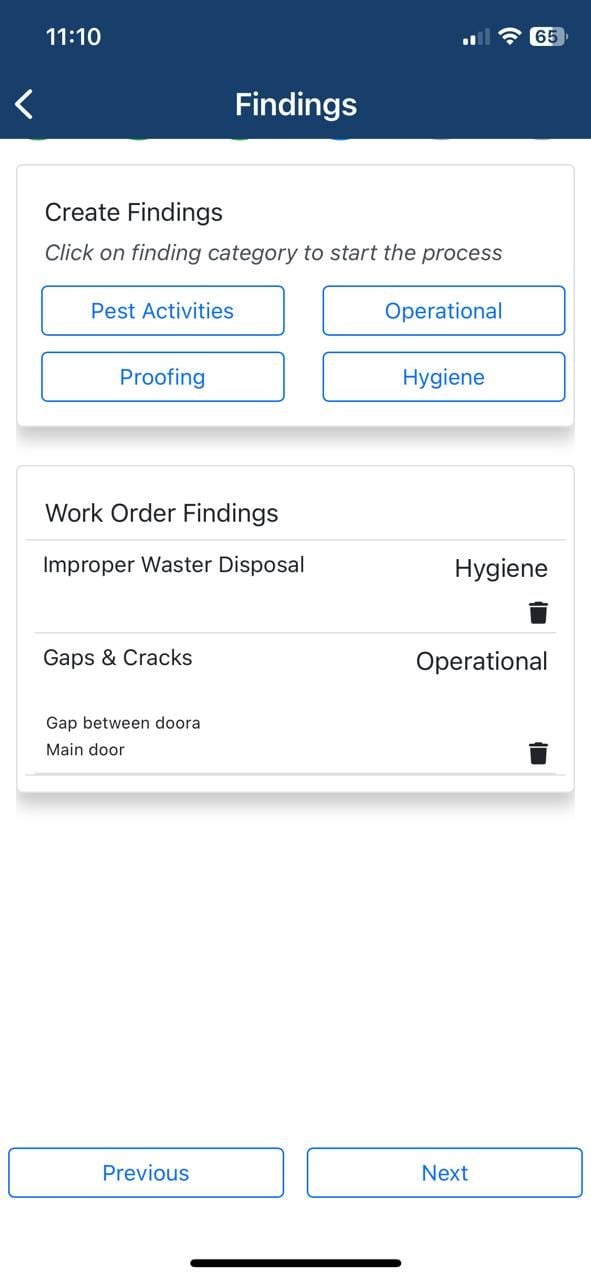
 ### 11. Findings
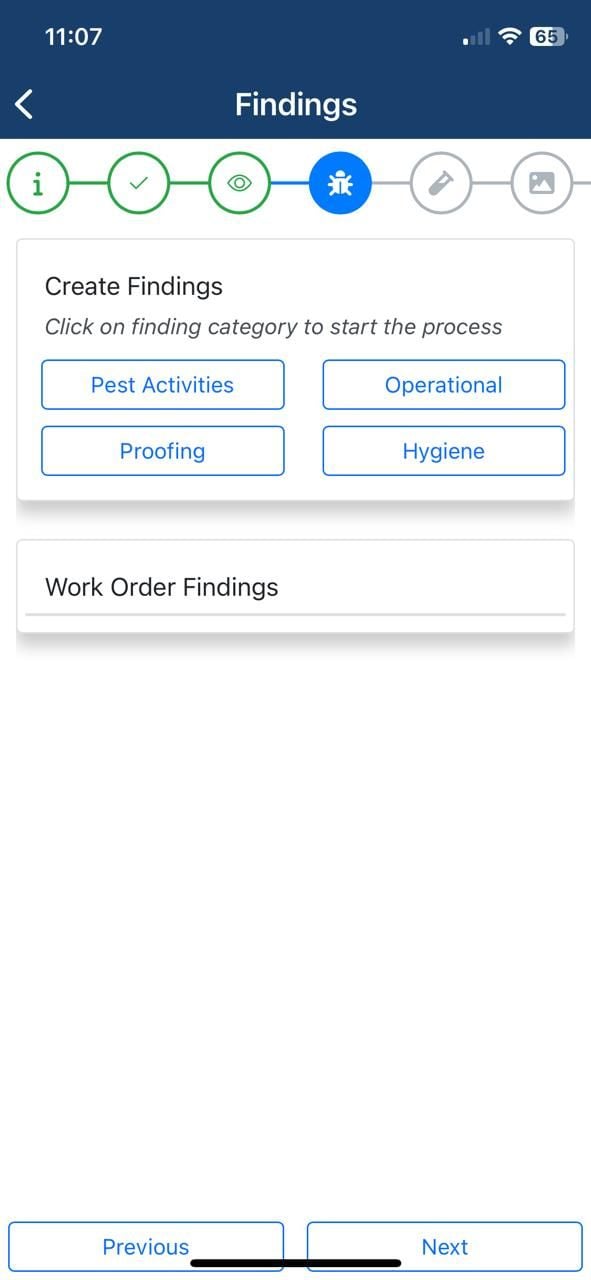
**Findings** : In the Findings step, you need to record any issues you observe at the location. "Findings" refers to any incorrect behaviors or conditions you identify, such as hygiene-related issues (e.g., waste, dirty areas, etc.).
You can categorize your findings under the following categories:
* **Pest Activity**
* **Operational**
* **Proofing**
* **Hygiene**
### 11. Findings
**Findings** : In the Findings step, you need to record any issues you observe at the location. "Findings" refers to any incorrect behaviors or conditions you identify, such as hygiene-related issues (e.g., waste, dirty areas, etc.).
You can categorize your findings under the following categories:
* **Pest Activity**
* **Operational**
* **Proofing**
* **Hygiene**
 ### 12. Creating Operational Finding
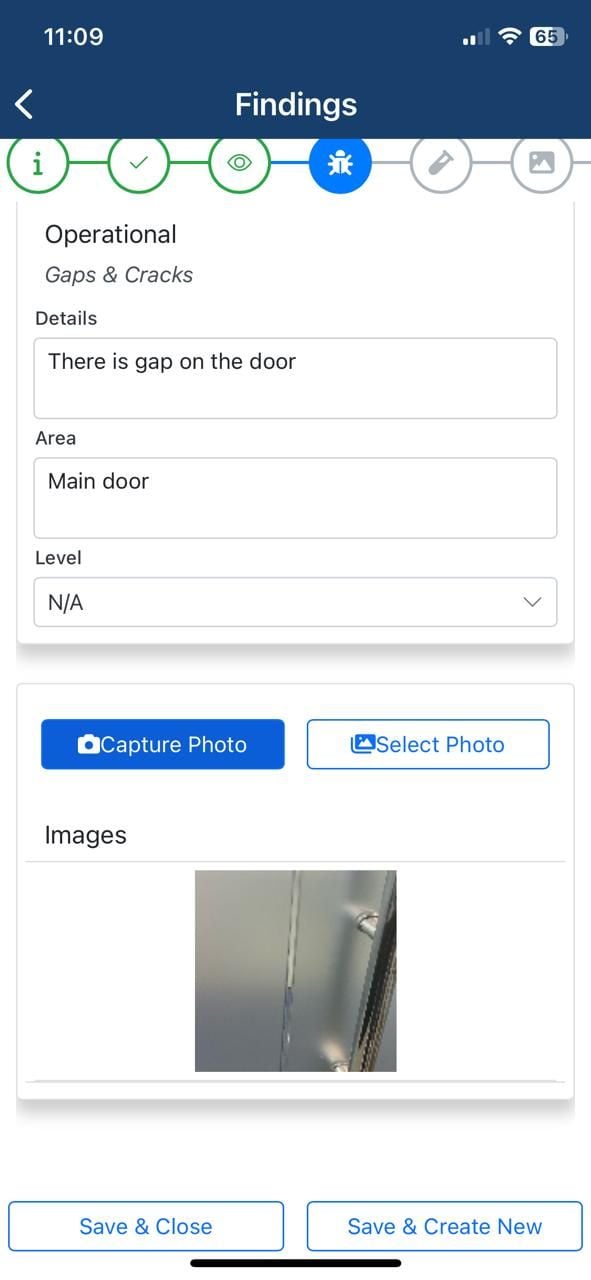
To create a new finding, click on the type you want to categorize it under. A new screen will open, allowing you to select the specific finding category.
For example, if you choose **"Operational Finding / Gap & Cracks"** , you will need to enter the following details:
* **Details** : A description of the finding.
* **Area** : The location where the issue was found.
* **Level** (if applicable): In some cases, such as with pest activity, you will need to specify the level of the infestation (e.g., low, medium, high).
Additionally, you can capture an image to provide proof or reference for the finding.
### 12. Creating Operational Finding
To create a new finding, click on the type you want to categorize it under. A new screen will open, allowing you to select the specific finding category.
For example, if you choose **"Operational Finding / Gap & Cracks"** , you will need to enter the following details:
* **Details** : A description of the finding.
* **Area** : The location where the issue was found.
* **Level** (if applicable): In some cases, such as with pest activity, you will need to specify the level of the infestation (e.g., low, medium, high).
Additionally, you can capture an image to provide proof or reference for the finding.
 > ### 💡 Save & Close / Save & Create New
### 13.
You can view and manage all findings from the main Findings screen. Additionally, you can see all the findings that have been inserted for this booking.
> ### 💡 Save & Close / Save & Create New
### 13.
You can view and manage all findings from the main Findings screen. Additionally, you can see all the findings that have been inserted for this booking.
 ### 14. Consumable
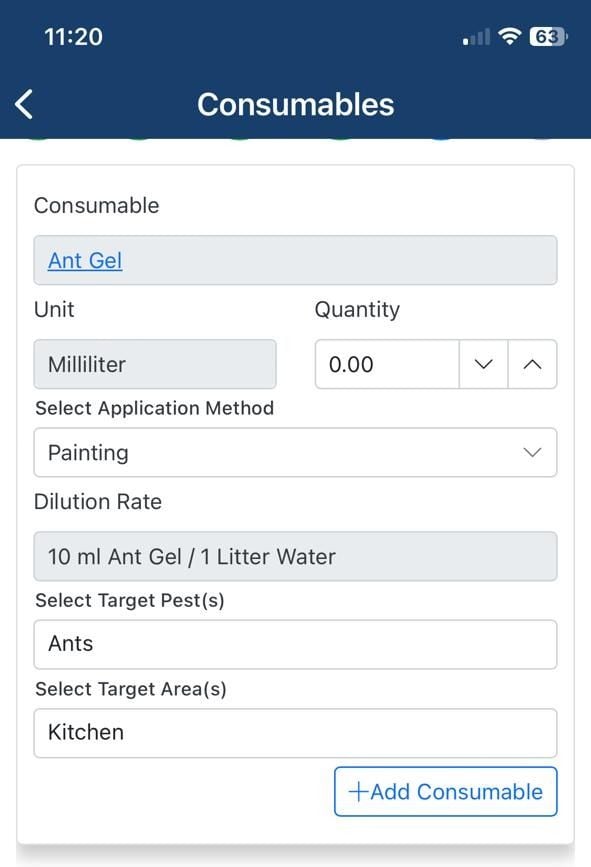
In the **Consumable** step, you need to record all the chemicals or products used for that booking.
This screen also helps you identify the dilution rate for each chemical and application method.
Once you select the consumable and the application method, the dilution rate will be displayed automatically.
There are additional fields you must fill out, including:
* **Quantity**
* **Target**
* **Target Area**
### 14. Consumable
In the **Consumable** step, you need to record all the chemicals or products used for that booking.
This screen also helps you identify the dilution rate for each chemical and application method.
Once you select the consumable and the application method, the dilution rate will be displayed automatically.
There are additional fields you must fill out, including:
* **Quantity**
* **Target**
* **Target Area**
 > ### 💡 +Add Consumable
>
> You can add as many consumables as needed by clicking the **"+ Add Consumable"** button for each new item.
### 15. Work Order Consumable
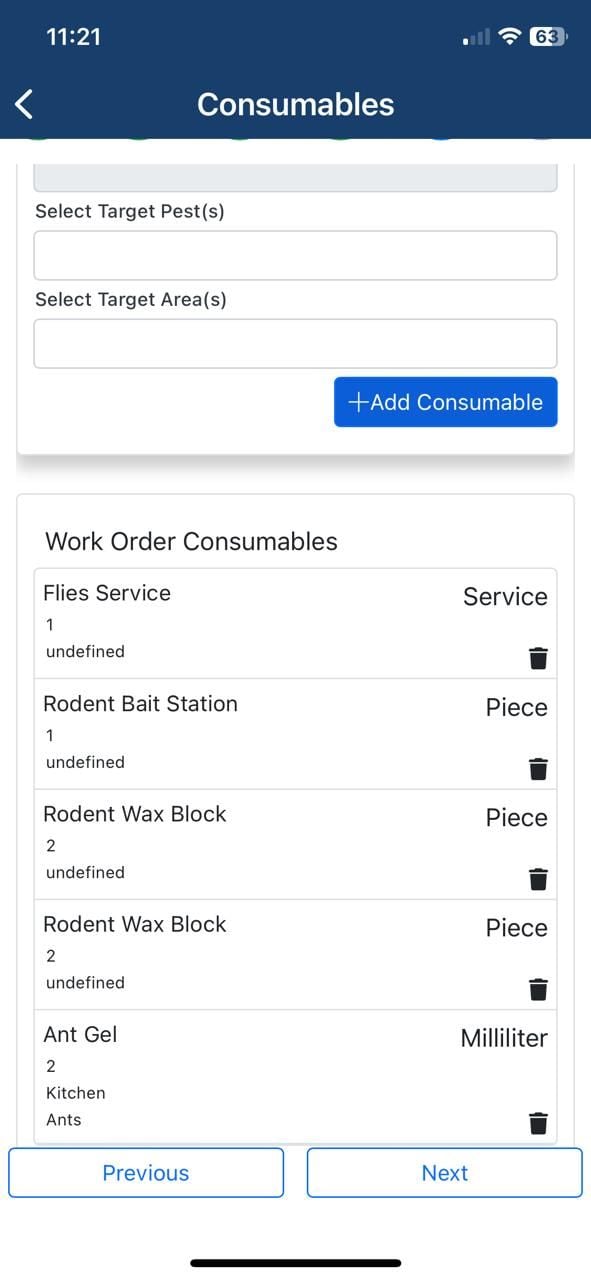
In the same **Consumable** screen, there is a **Work Order Consumable** section. This section displays all the consumables used in the booking, and you can manage them from here.
> ### 💡 +Add Consumable
>
> You can add as many consumables as needed by clicking the **"+ Add Consumable"** button for each new item.
### 15. Work Order Consumable
In the same **Consumable** screen, there is a **Work Order Consumable** section. This section displays all the consumables used in the booking, and you can manage them from here.
 > ### ⚠️ Monitoring Points
>
> The monitoring points added earlier and the **Replace Consumable** action step will be automatically included in the consumable section, so you don’t need to enter them again.
### 16. Supportive Photos
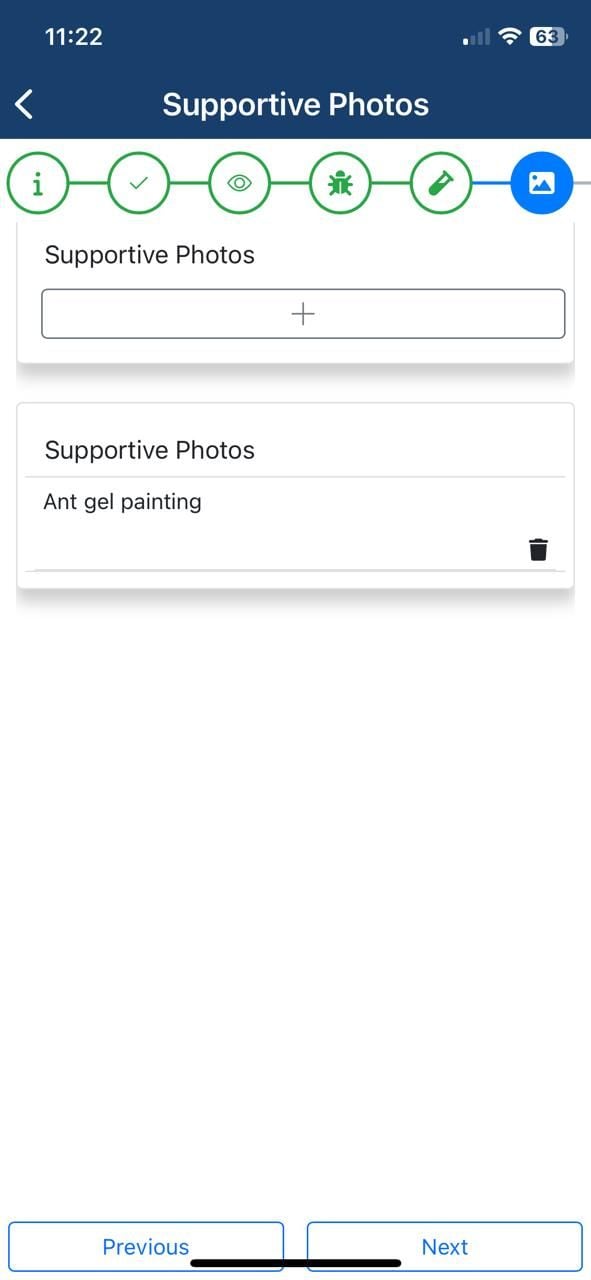
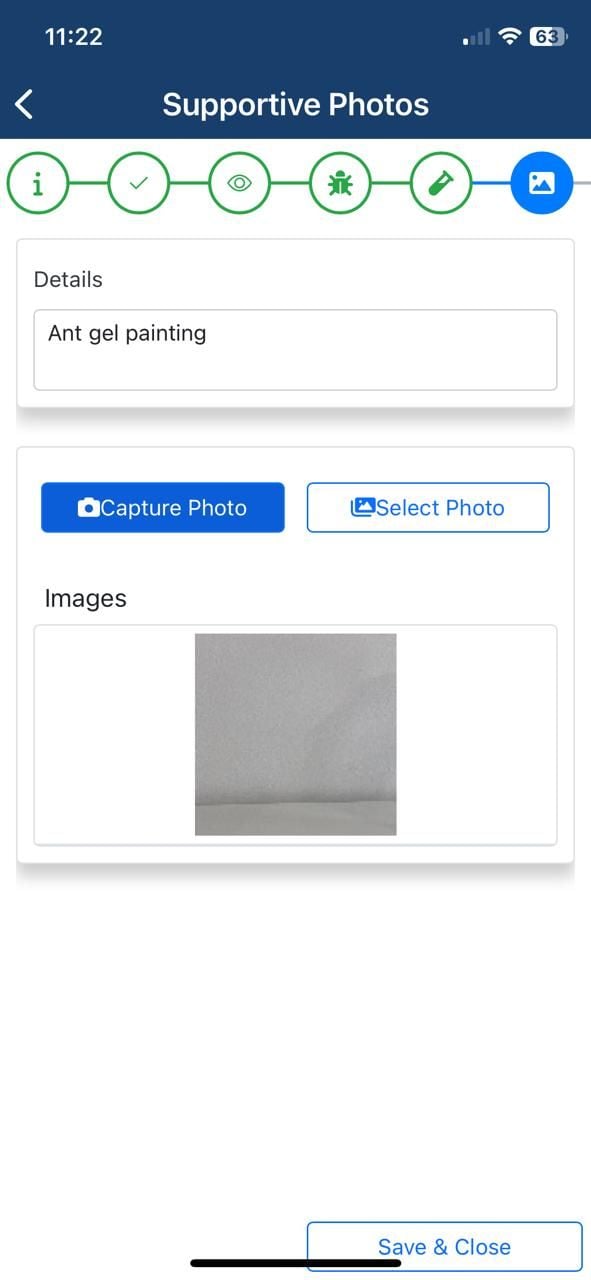
In this step, you can add supporting photos for your work. Some customers may request photos to verify the work done, and you can upload them here.
Simply click the **+** button to insert or capture a new supporting photo.
> ### ⚠️ Monitoring Points
>
> The monitoring points added earlier and the **Replace Consumable** action step will be automatically included in the consumable section, so you don’t need to enter them again.
### 16. Supportive Photos
In this step, you can add supporting photos for your work. Some customers may request photos to verify the work done, and you can upload them here.
Simply click the **+** button to insert or capture a new supporting photo.
 ### 17.
Just fill in the main details and add the photo.
### 17.
Just fill in the main details and add the photo.
 ### 18. Summary
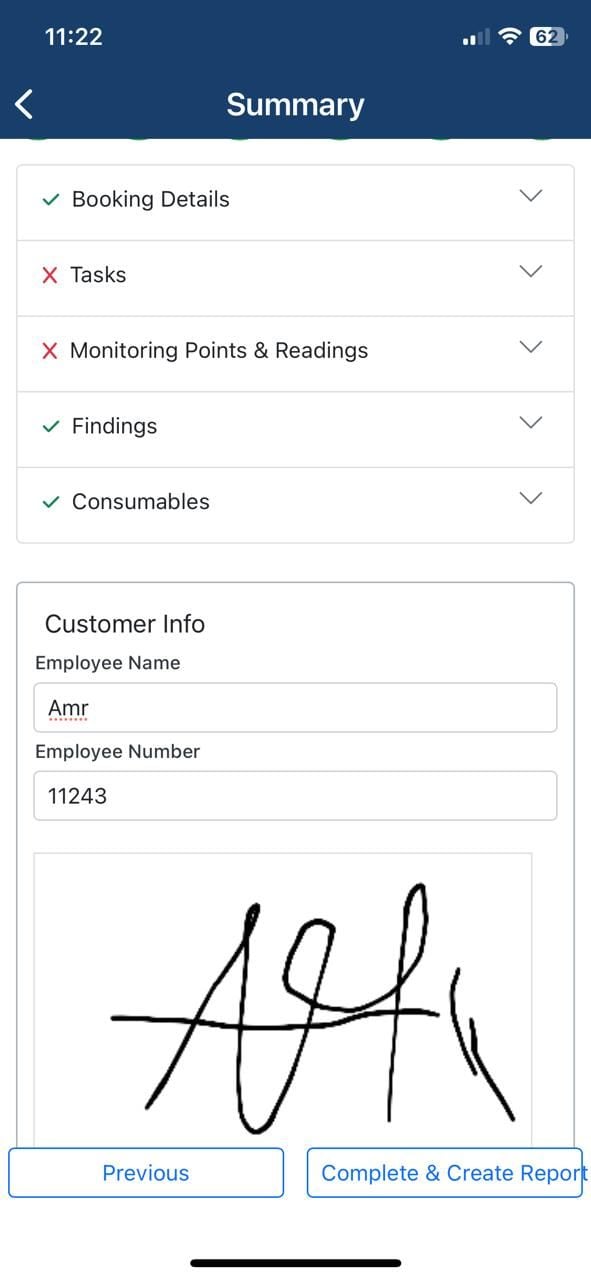
As you can see, we have now completed the work and are in the final step.
Here, you can review all the work you've done. If any step or task was missed, a **red "X"** will appear next to it, and you can go back to address it.
Additionally, there is a **Customer Info** section where you need to enter the name of the employee who handled the finished work, along with their employee number and signature.
### 18. Summary
As you can see, we have now completed the work and are in the final step.
Here, you can review all the work you've done. If any step or task was missed, a **red "X"** will appear next to it, and you can go back to address it.
Additionally, there is a **Customer Info** section where you need to enter the name of the employee who handled the finished work, along with their employee number and signature.
 > ### 💡 Complete & Create Report
>
> Once you finish, click **Complete & Create Report** , and the work order will be automatically marked as completed.
### 19. Completed Work Order
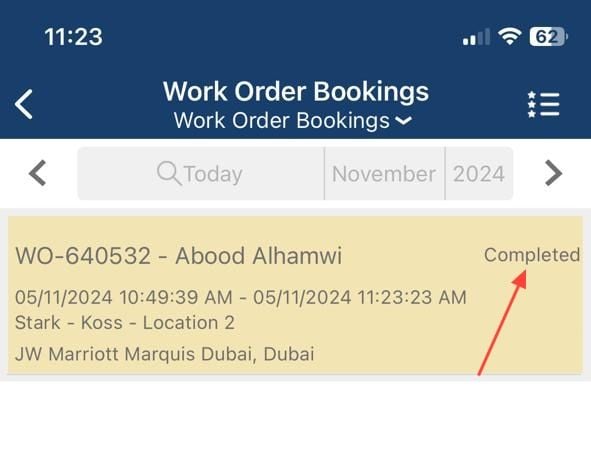
As you can see in the booking list, the color of the work order booking has changed to yellow, indicating that the work order is complete. Additionally, the status of the booking has been updated to "Completed."
> ### 💡 Complete & Create Report
>
> Once you finish, click **Complete & Create Report** , and the work order will be automatically marked as completed.
### 19. Completed Work Order
As you can see in the booking list, the color of the work order booking has changed to yellow, indicating that the work order is complete. Additionally, the status of the booking has been updated to "Completed."
 ### 20. Sync !!
Once you’ve finished and are ready to upload the work to the Operations Manager, simply click the **Sync** button, and it will be synced with the server.
### 20. Sync !!
Once you’ve finished and are ready to upload the work to the Operations Manager, simply click the **Sync** button, and it will be synced with the server.
 �����������������������